Masoor Dal Chilla – Easy Savory Red Lentil Pancakes
Masoor Dal Chilla | Savory Red Lentil Pancakes are an absolute delight for so many reasons, and once you try them, you’ll understand why they’re a staple in my kitchen and so many others. Forget those bland breakfast options; this recipe offers a burst of flavor and a satisfying texture that’s both comforting and invigorating. The beauty of these Masoor Dal Chilla | Savory Red Lentil Pancakes lies in their simplicity and incredible versatility. They’re packed with protein from the humble red lentils, making them a wonderfully wholesome choice for breakfast, lunch, or even a light dinner. What truly sets this Masoor Dal Chilla apart is the subtle earthy aroma and the delightful crispy edges that give way to a tender, fluffy interior. It’s the perfect canvas for your favorite toppings, from cooling yogurt and spicy chutneys to fresh herbs and a squeeze of lime. Get ready to fall in love with this incredibly delicious and nutritious dish!
Masoor Dal Chilla | Savory Red Lentil Pancakes
Welcome back to my kitchen! Today, we’re diving into a wonderfully simple yet incredibly satisfying dish that’s perfect for breakfast, a light lunch, or even a healthy snack: Masoor Dal Chilla, also known as Savory Red Lentil Pancakes. These pancakes are a fantastic way to incorporate more protein and fiber into your diet, and they’re so versatile. Forget those sweet, sugary pancakes; these are savory, packed with flavor, and wonderfully wholesome.
The beauty of masoor dal chilla lies in its simplicity and the humble ingredients it uses. Red lentils, or masoor dal, are a staple in many Indian households, known for their quick cooking time and mild, earthy flavor. When ground into a batter and cooked on a griddle, they transform into delightful, savory pancakes that are both nutritious and delicious. I love making these on busy mornings because the prep is minimal, and they cook up in no time.
Ingredients:
Now that we have our ingredients gathered, let’s get started on creating these delightful savory pancakes. The process is quite straightforward, and I’ll guide you through each step to ensure you get perfect results every time.
Cooking Instructions:
Step 1: Soaking the Lentils
The first crucial step for making our masoor dal chilla is to thoroughly soak the red lentils. Take your 1 cup of split red lentils and rinse them under cold running water a couple of times to remove any dust or impurities. Once rinsed, transfer the lentils to a medium-sized bowl and add the 3 cups of water. You want enough water to generously cover the lentils. Let them soak for at least 2 to 3 hours. This soaking period is essential because it softens the lentils, making them easier to grind into a smooth batter and also aids in their digestion. If you’re in a real hurry, you can soak them in hot water for about 30 minutes, but I find the longer soak in cold water yields the best texture.
Step 2: Preparing the Batter
After the lentils have soaked and are nice and soft, it’s time to drain them completely. Discard the soaking water. Now, we’ll transfer the soaked lentils to a blender or a food processor. To this, we’ll add our aromatics. For a subtle kick of heat, add 1 green chilli. You can adjust this based on your spice preference; if you like it milder, you can remove the seeds and membranes. Next, add a 1-inch piece of fresh gin extractger. Grate it roughly before adding, or just chop it into smaller pieces for easier blending. Don’t forget to add 1 teaspoon of kosher salt to season our batter. Now, pour in ½ cup of water. This amount of water is a starting point; you might need a little more or less depending on your blender and the consistency of the lentils. Begin extract to blend the mixture. We’re aiming for a smooth, thick batter, similar in consistency to pancake batter or thick yogurt. Scrape down the sides of the blender as needed to ensure everything is well combined. If the batter is too thick and your blender is struggling, add a tablespoon of water at a time until you achieve the desired consistency.
Step 3: Adding Freshness and Flavor
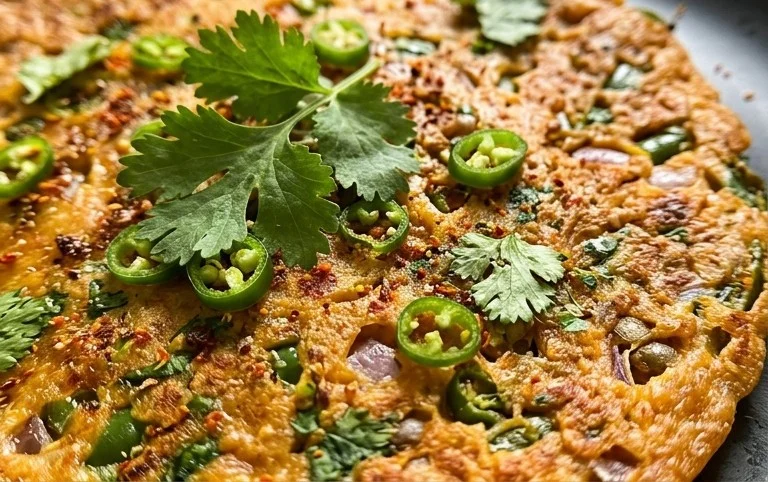
Once you have a smooth batter, it’s time to add the finishing touches that will elevate the flavor profile of our chillas. Gently stir in 2 tablespoons of finely chopped fresh cilantro. Cilantro adds a burst of freshness and a lovely herbal note that complements the earthy lentils beautifully. Give the batter a final mix to ensure the cilantro is evenly distributed. At this stage, you can also do a quick taste test and adjust the salt if necessary. Remember, the chillas will be cooked without much additional seasoning, so getting the salt right in the batter is important.
Step 4: Cooking the Chillas
Now for the fun part – cooking! Heat a non-stick skillet or a cast-iron griddle over medium heat. Once the pan is hot, add about 1 teaspoon of oil and spread it around evenly. You can use any cooking oil you prefer, but a neutral oil like vegetable or canola works well. Pour a ladleful of the lentil batter onto the hot skillet. Start with a medium-sized ladleful; you can adjust the size of your chillas as you get more comfortable. Gently spread the batter with the back of the ladle in a circular motion, much like you would with traditional pancakes, to form a thin, even circle. The batter should be thick enough to hold its shape but spreadable.
Step 5: Flipping and Serving
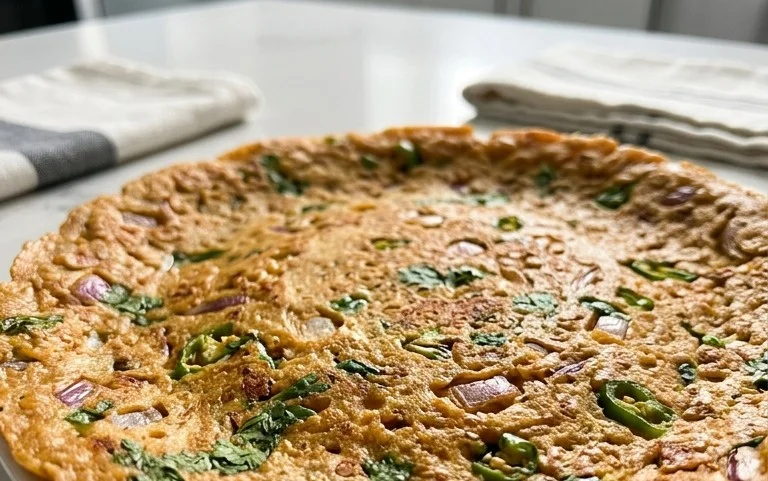
Cook the chilla for about 2 to 3 minutes on the first side, or until you see small bubbles forming on the surface and the edges start to look slightly dry and golden brown. Carefully slide a spatula underneath and flip the chilla. Cook the other side for another 1 to 2 minutes, until it’s golden brown and cooked through. You might need to add a little more oil to the pan between each chilla, especially if you’re not using a very good non-stick pan. Repeat this process with the remaining batter, adding oil to the pan as needed and stacking the cooked chillas on a plate. These masoor dal chillas are absolutely delicious served hot. They pair wonderfully with a variety of accompaniments. I love serving them with a dollop of plain yogurt, some spicy tomato chutney, or even a simple pickle. They are hearty enough to be a meal on their own, offering a fantastic balance of carbohydrates, protein, and fiber. Enjoy this healthy and flavorful treat!
Conclusion:
I hope you’re as excited to try these Savory Red Lentil Pancakes, or Masoor Dal Chilla, as I am to share them with you! This recipe is truly a winner because it’s incredibly healthy, packed with protein and fiber from the masoor dal, and surprisingly simple to make. The texture is wonderfully soft on the inside with just a hint of crispness on the edges, making each bite a delight. They’re a fantastic alternative to traditional breakfast or snack options, and perfect for a light lunch too.
For serving, I love enjoying my Masoor Dal Chilla with a dollop of cooling plain yogurt or a zesty mint-coriander chutney. A side of pickled onions or some simple sautéed vegetables also complements them beautifully. Don’t be afraid to experiment with variations! You can add finely chopped onions, tomatoes, or spinach directly into the batter for an extra burst of flavor and nutrition. Some grated cheese also melts beautifully into the chilla. I truly encourage you to give these Savory Red Lentil Pancakes a try. They are a testament to how wholesome ingredients can create something truly delicious and satisfying.
Frequently Asked Questions:
Q1: Can I make the Masoor Dal Chilla batter ahead of time?
Yes, absolutely! You can prepare the batter a day in advance and store it in an airtight container in the refrigerator. You might need to add a tablespoon or two of water to thin it out slightly before cooking, as it can thicken overnight.
Q2: What is the best way to store leftover chillas?
Leftover Masoor Dal Chillas can be stored in an airtight container in the refrigerator for up to 2-3 days. Reheat them gently in a non-stick pan or toaster oven to regain their crispness.
Q3: Are these pancakes gluten-free?
Yes, this Masoor Dal Chilla recipe is naturally gluten-free as it uses red lentils as its base, making it a great option for those with gluten sensitivities.
Masoor Dal Chilla | Savory Red Lentil Pancakes
Delicious and healthy savory pancakes made from split red lentils, spiced with green chili and ginger, and garnished with fresh cilantro.
Ingredients
-
1 cup split red lentils (masoor dal)
-
3 cups water (for soaking lentils)
-
1 green chilli
-
1 inch ginger
-
1 teaspoon kosher salt
-
½ cup water (for grinding)
-
2 tablespoons cilantro (finely chopped)
-
2 tablespoons oil
Instructions
-
Step 1
Rinse the split red lentils thoroughly and soak them in 3 cups of water for at least 2-3 hours, or until softened. -
Step 2
Drain the soaked lentils and transfer them to a blender. Add the green chilli, ginger, kosher salt, and ½ cup of water for grinding. -
Step 3
Blend the mixture until a smooth batter is formed. Adjust water if needed to achieve a pouring consistency, similar to pancake batter. -
Step 4
Heat 1 tablespoon of oil in a non-stick skillet or griddle over medium heat. Pour a ladleful of batter onto the hot skillet and spread it into a circular shape. -
Step 5
Cook for 2-3 minutes on one side until golden brown and set. Drizzle a little more oil around the edges if desired. -
Step 6
Flip the chilla carefully and cook for another 1-2 minutes on the other side until cooked through. -
Step 7
Transfer the cooked chilla to a plate and sprinkle with finely chopped cilantro. Repeat with the remaining batter, adding oil as needed.
Important Information
Nutrition Facts (Per Serving)
It is important to consider this information as approximate and not to use it as definitive health advice.
Allergy Information
Please check ingredients for potential allergens and consult a health professional if in doubt.