Easy Strawberry Sando Recipe Quick Delight
For a taste of pure, unadulterated bliss that takes mere minutes to create, look no further than this incredible 4-ingredient strawberry sando. There’s something undeniably magical about this simple yet spectacular treat. It’s the kind of dessert that evokes childhood nostalgia, brings a smile to anyone’s face, and has gained a cult following for its effortless charm. What makes the 4-ingredient strawberry sando so special? It’s the perfect harmony of textures and flavors: the delicate sweetness of fresh strawberries, the creamy embrace of whipped cream, all nestled between two slices of soft, pillowy bread. This isn’t just a dessert; it’s an experience. It’s the perfect answer for those moments when you crave something sweet and satisfying but don’t have a lot of time or ingredients on hand. Get ready to fall in love with this effortlessly delicious 4-ingredient strawberry sando!

The Effortless Delight: My Go-To 4-Ingredient Strawberry Sando
Sometimes, the most exquisite flavors come from the simplest combinations. And when it comes to simple yet utterly satisfying treats, the strawberry sando reigns supreme. Imagin extracte this: pillowy soft bread, sweet, juicy strawberries, and a cloud of creamy whipped cream, all coming together in a symphony of textures and tastes. It’s a dessert that’s both nostalgic and sophisticated, perfect for a delightful afternoon pick-me-up, a charming brunch addition, or even a light dessert. What’s even better? You only need four ingredients to create this little slice of heaven. Yes, you read that right – just four! This recipe is so straightforward, even a complete begin extractner in the kitchen can master it. Let’s dive into what you’ll need and how to bring this delightful creation to life.
Ingredients:
Preparation: Bringin extractg Your Ingredients Together
Before we begin extract the assembly, let’s get our ingredients ready. This initial step ensures a smooth and efficient process, allowing us to build our strawberry sando without any hiccups.
Strawberry Preparation:
Start by gently washing your strawberries. We want to remove any lingering dirt without bruising these delicate fruits. Once washed, pat them completely dry with a paper towel. Excess moisture can make our whipped cream watery and dilute the sweetness of the strawberries. Now, for the exciting part: slicing. Aim for relatively thin slices, about ¼ inch thick. This will allow the strawberries to be evenly distributed within the sando and release their delicious juices. You’ll want about 4-5 slices per sandwich, depending on the size of your strawberries and bread. Reserve a few of the prettiest slices for garnish if you’re feeling fancy.
Cream Preparation:
For the creamiest whipped cream, ensure your whipping cream (or heavy cream) is thoroughly chilled. This is crucial for achieving stiff peaks. You can even pop your mixing bowl and whisk attachment (if using a stand mixer) into the freezer for about 10-15 minutes beforehand. This extra chill will help the cream whip up faster and become fluffier.
Assembly: Crafting Your Strawberry Sando
Now for the fun part – bringin extractg all these beautiful ingredients together! The assembly is almost as satisfying as the first bite.
Step 1: Sweetening the Strawberries
In a small bowl, combine your sliced strawberries with the 1 tablespoon of white granulated sugar. Gently toss them together. The sugar will begin extract to draw out the natural juices from the strawberries, creating a light, sweet syrup. Let these macerate for about 5-10 minutes while you whip your cream. This simple step significantly enhances the strawberry flavor and adds a lovely sweet glaze to your sando. Don’t skip this – it makes a world of difference!
Step 2: Whipping the Cream to Perfection
Pour your chilled whipping cream into your chilled bowl. If you’re using an electric mixer, start on a low speed and gradually increase to medium-high. If you’re whisking by hand (a good arm workout!), start with brisk circular motions. You’re looking for soft peaks initially, where the cream holds its shape but the tips curl over. Keep going until you achieve stiff peaks, meaning the cream stands up straight when you lift the whisk. Be careful not to over-whip, or you’ll end up with butter! The cream should be smooth, airy, and hold its form beautifully.
Step 3: Building the Base Layer
Lay your two slices of milk bread flat on a clean surface. Milk bread is preferred for its incredibly soft and slightly sweet texture, but any good quality thick white bread will work wonderfully. You can toast the bread lightly if you prefer a bit of crunch, but for that authentic, melt-in-your-mouth experience, I prefer it soft and un-toasted. This provides the perfect canvas for our delicious fillings.
Step 4: Spreading the Creamy Goodness
Generously spread half of your whipped cream onto one slice of the bread, creating an even layer. Don’t be shy! The cream acts as both a delicious filling and a delightful cushion for the strawberries. This also helps to prevent the bread from becoming too soggy from the strawberry juices.
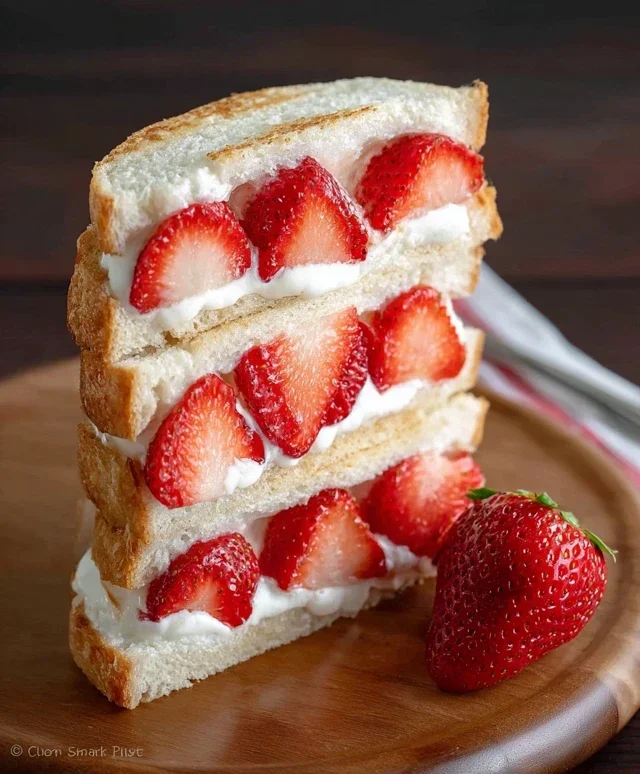
Step 5: Layering the Sweet Strawberries
Now, carefully arrange your sugar-sweetened strawberry slices over the layer of whipped cream on the bread. Try to distribute them evenly, covering most of the surface. You want a good balance of cream and strawberry in every bite. You can overlap them slightly. The beautiful red of the strawberries against the white cream is a visual treat that foreshadows the deliciousness to come.
Step 6: The Grand Finnon-alcoholic ale – Topping and Pressing
Spread the remaining whipped cream on top of the strawberry layer. This creates a beautiful white layer that encases the strawberries. Then, gently place the second slice of bread on top, cream-side down, to complete your sando. Press down very gently with your hands to help the sandwich hold its shape. You don’t want to crush it, just ensure everything is nestled together nicely.
Step 7: The Perfect Slice
For the classic presentation, and to make it easier to eat, carefully slice your strawberry sando in half diagonally using a sharp knife. A serrated knife can be helpful here to slice through the soft bread without tearing it. Admire the beautiful layers before you take your first bite.
And there you have it! A simple, elegant, and incredibly delicious 4-ingredient strawberry sando that’s perfect any time of day. Enjoy this little moment of bliss.
Conclusion:
And there you have it – the incredibly simple yet utterly delightful 4-ingredient Strawberry Sando! This recipe is a testament to how minimal ingredients can yield maximum flavor and joy. Perfect for a quick breakfast, a satisfying snack, or even a light dessert, the 4-ingredient Strawberry Sando is a winner because of its speed, ease, and delicious results. The creamy filling beautifully complements the sweet, slightly tart strawberries, all encased in soft, pillowy bread. It’s a taste of pure comfort that’s hard to resist.
Serving suggestions are as versatile as the sandwich itself! Enjoy it as is for a classic treat, or elevate it by dusting with a little powdered sugar, serving with a side of fresh berries, or even a dollop of whipped cream for extra indulgence. For variations, consider swapping the cream cheese for mascarpone for a richer texture, or adding a hint of vanilla extract to the filling. You could also try different types of bread like brioche or even a slightly toasted challah for a different mouthfeel.
I truly encourage you to give this 4-ingredient Strawberry Sando a try. It’s a recipe that proves you don’t need a lot of fuss to create something truly special. It’s approachable for even the most novice cooks and is guaranteed to bring a smile to your face.
Frequently Asked Questions about the 4-Ingredient Strawberry Sando:
Q1: Can I use frozen strawberries?
Yes, you can absolutely use frozen strawberries! If using frozen, make sure to thaw them completely and drain off any excess liquid before mashing or chopping them. This will prevent your filling from becoming too watery. They will still offer that lovely strawberry flavor!
Q2: What kind of bread is best for this recipe?
The recipe calls for soft, white bread, which creates that classic, delicate texture. However, feel free to experiment! Brioche, challah, or even a fluffy milk bread would make for wonderfully decadent variations. A lightly toasted sourdough could offer an interesting contrast in flavor and texture, too.
Q3: How long does the strawberry sando last?
For the best taste and texture, it’s recommended to enjoy your 4-ingredient Strawberry Sando immediately after preparation. However, if you need to store it, wrap it tightly in plastic wrap or place it in an airtight container in the refrigerator. It should be consumed within 1-2 days for optimal freshness, as the bread can become soggy over time.
4-Ingredient Strawberry Sando
A simple and delightful Japanese-inspired strawberry sandwich using just four ingredients.
Ingredients
-
2 thick slices milk bread (or regular thick white bread, like Texas toast)
-
5 strawberries (with tops removed)
-
1 tbsp white granulated sugar
-
1/2 cup whipping cream (or heavy cream chilled)
-
1 tsp vanilla extract (optional, for added flavor)
-
1/4 tsp powdered sugar (for dusting, optional)
Instructions
-
Step 1
Gently mash the strawberries in a small bowl with the granulated sugar. Let sit for about 5 minutes to release their juices. -
Step 2
In a separate chilled bowl, whip the heavy cream (and vanilla extract, if using) until stiff peaks form. Be careful not to over-whip. -
Step 3
Spread a generous layer of the whipped cream onto one slice of bread. -
Step 4
Spoon the sugared strawberries over the whipped cream on the same slice of bread. -
Step 5
Top with the second slice of bread and gently press down. -
Step 6
Slice the sandwich in half diagonally or into desired shapes. Dust with powdered sugar if desired.
Important Information
Nutrition Facts (Per Serving)
It is important to consider this information as approximate and not to use it as definitive health advice.
Allergy Information
Please check ingredients for potential allergens and consult a health professional if in doubt.