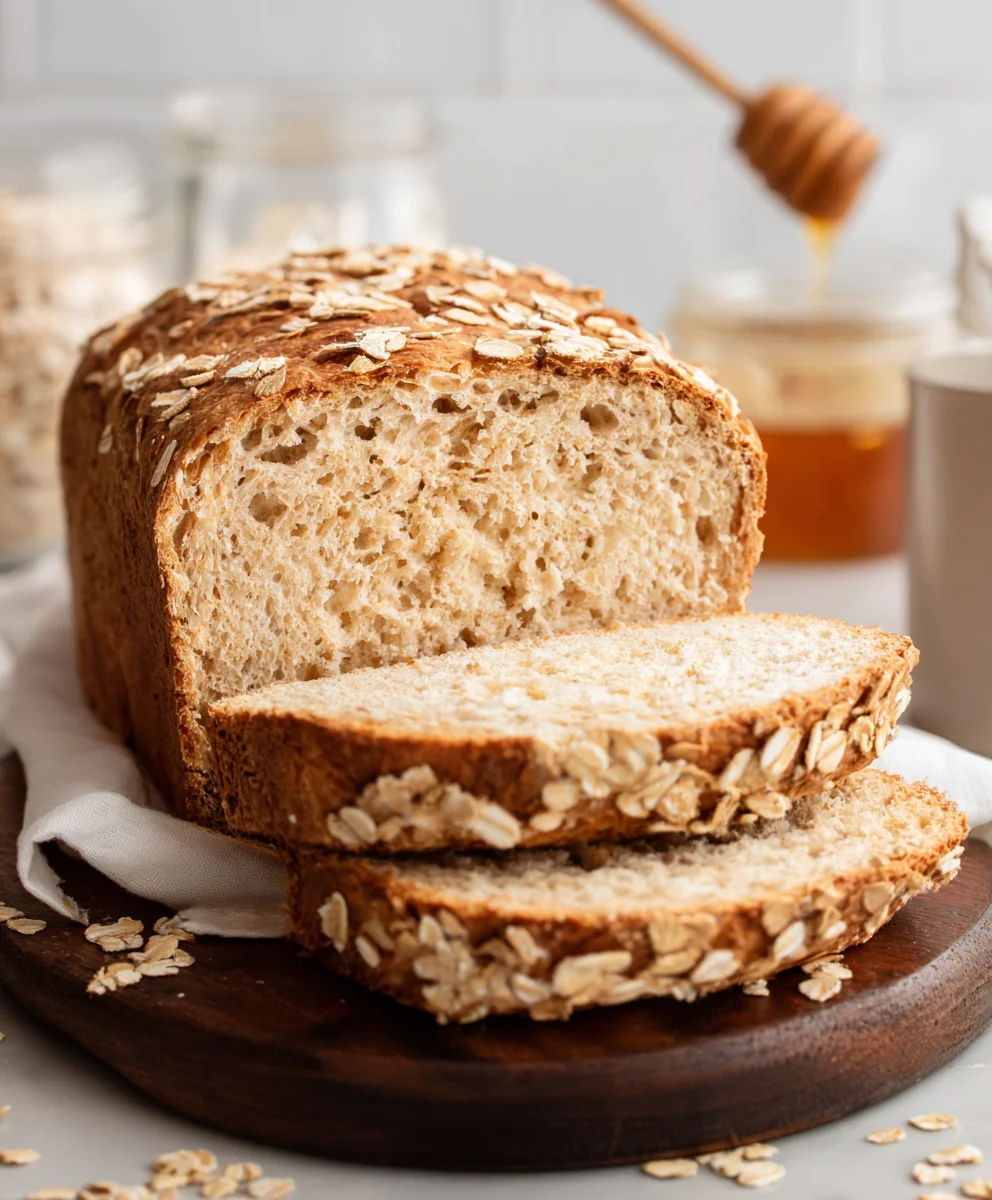
Easy Honey Oat Bread Recipe – Soft & Delicious
Honey Oat Bread is more than just a simple loaf; it’s a warm hug in edible form, a testament to the simple pleasures of home baking. There’s a universal appeal to its comforting aroma that fills the kitchen, a scent promising a delightful chegrape juicess and a subtle sweetness that dances on the palate. We love Honey Oat Bread because it strikes that perfect balance between wholesome goodness and irresistible flavor. It’s the ideal companion for your morning toast, a sturdy base for your favorite sandwiches, or simply enjoyed with a generous slather of butter. What truly sets this particular Honey Oat Bread apart is the thoughtful combination of hearty rolled oats, which lend a satisfying texture, and the golden elixir of honey, providing a natural, nuanced sweetness that elevates it beyond the ordinary. Get ready to bake a loaf that will become a beloved staple in your home.
Ingredients:
- 3 cups all-purpose flour, plus extra for dusting
- ¾ cup rolled oats, plus 2 tablespoons for topping
- 2 ¼ teaspoons active dry yeast
- 1 ½ teaspoons salt
- 2 tablespoons unsalted butter, softened
- 1 cup milk
- ¼ cup lukewarm water (about 105-115°F or 40-46°C)
- ¼ cup honey, plus 2 tablespoons for topping
Preparing the Dough
Activating the Yeast
Begin extract by ensuring your yeast is active and ready to work its magic. In a small bowl, combine the ¼ cup of lukewarm water with the ¼ cup of honey. Stir gently until the honey is dissolved. Sprinkle the 2 ¼ teaspoons of active dry yeast over the surface of the honey-water mixture. Let this sit undisturbed for about 5 to 10 minutes. You should see a foamy, bubbly layer form on top, which is a clear sign that your yeast is alive and eager to leaven the bread. If you don’t see this foam, your yeast may be old or the water wasn’t the correct temperature, and you’ll need to start with fresh yeast.
Combining Wet and Dry Ingredients
While the yeast is blooming, in a large mixing bowl, whisk together the 3 cups of all-purpose flour, ¾ cup of rolled oats, and 1 ½ teaspoons of salt. Make sure these dry ingredients are well combined. In a separate, microwave-safe bowl or in a small saucepan over low heat, warm the 1 cup of milk and the 2 tablespoons of unsalted butter. Heat just until the butter is melted and the milk is warm to the touch, but not hot. You don’t want to cook the yeast or the dough. Once the yeast mixture is foamy, carefully pour it into the bowl with the dry ingredients. Add the warmed milk and butter mixture as well.
Mixing and Kneading the Dough
Using a sturdy spoon or a dough wgin extractk, begin to mix all the ingredients together until a shaggy dough forms. It will look a bit messy at this stage, but don’t worry. Once the ingredients are mostly incorporated, turn the dough out onto a lightly floured surface. Now comes the fun part: kneading! Push the dough away from you with the heels of your hands, then fold it back over itself. Rotate the dough a quarter turn and repeat. Continue this process for about 8 to 10 minutes. You’re looking for a smooth, elastic dough that springs back when gently poked. If the dough feels too sticky, add a tiny bit more flour, a tablespoon at a time, but be careful not to add too much, as this can make your bread tough. The dough should be slightly tacky but manageable.
First Rise
Letting the Dough Proof
Once your dough is smooth and elastic, shape it into a ball. Lightly grease the large mixing bowl you used earlier with a little oil or cooking spray. Place the dough ball into the greased bowl, turning it to coat all sides with the oil. This prevents a dry skin from forming. Cover the bowl tightly with plastic wrap or a clean kitchen towel. Find a warm, draft-free spot in your kitchen to let the dough rise. This could be in a slightly warmed oven (turned off, of course!), on top of your refrigerator, or near a sunny window. Allow the dough to rise for 1 to 1 ½ hours, or until it has doubled in size. The time can vary depending on the temperature of your room.
Shaping and Second Rise
Shaping the Loaf
Once the dough has doubled, gently punch it down to release the air. Turn the dough out onto your lightly floured surface once more. You can shape this dough into a classic loaf for a standard loaf pan, or you can shape it into a round boule that can be baked on a baking sheet. For a loaf pan, gently flatten the dough into a rectangle and then roll it up tightly, pinching the seam to seal. Place the shaped loaf, seam-side down, into a greased 9×5 inch loaf pan. If you’re making a boule, gently shape it into a round ball and place it on a baking sheet lined with parchment paper.
The Final Proof
Now it’s time for the second rise, which is crucial for a light and airy crum extractb. Lightly cover the shaped loaf or boule with plastic wrap or a clean kitchen towel. Let it rise again in a warm, draft-free spot for another 30 to 45 minutes, or until it has visibly puffed up and looks nearly double in size. While the dough is on its final rise, preheat your oven to 375°F (190°C).
Baking the Honey Oat Bread
The Finishing Touches
Just before baking, you have the option to add a beautiful and flavorful topping. In a small bowl, mix together the 2 tablespoons of honey and the 2 tablespoons of rolled oats. Gently brush the top of the risen loaf with a little water or an egg wash (1 egg beaten with 1 tablespoon of water) – this helps the topping adhere. Sprinkle the honey-oat mixture evenly over the top of the loaf. This adds a lovely texture and a touch of sweetness that perfectly complements the bread.
Baking to Perfection
Carefully place the loaf pan or baking sheet into the preheated oven. Bake for 30 to 35 minutes for a loaf pan, or about 25 to 30 minutes for a boule. The bread is done when it’s golden brown on top and the bottom sounds hollow when tapped. If the top is browning too quickly, you can loosely tent it with aluminum foil during the last 10-15 minutes of baking.
Cooling and Enjoying
Once baked, immediately remove the bread from the loaf pan and place it on a wire cooling rack. This allows air to circulate around the entire loaf, preventing a soggy bottom. Let the Honey Oat Bread cool completely before slicing. This is important because the inside is still setting as it cools. Slicing too early can result in a gummy texture. Once cooled, slice generously and enjoy the wonderful aroma and delicious taste of your homemade Honey Oat Bread!

Conclusion:
There you have it – a simple yet incredibly satisfying recipe for Honey Oat Bread! This wholesome loaf is perfect for everything from your morning toast to hearty sandwiches. The subtle sweetness of honey beautifully complements the nutty texture of oats, creating a delightful flavor profile that’s both comforting and nourishing.
I encourage you to give this Honey Oat Bread a try! Once you experience the aroma filling your kitchen as it bakes and the taste of a freshly made loaf, you’ll understand why homemade bread is so special. Don’t be afraid to experiment! This recipe is a fantastic base for so many delicious additions.
For serving, this Honey Oat Bread is divine simply spread with butter. It also pairs wonderfully with cream cheese, your favorite jam, or even a drizzle of more honey. For a savory option, consider topping it with avocado and a sprinkle of chili flakes.
Thinking about variations? You can easily add seeds like sunflower or pumpkin seeds to the dough for extra crunch and nutrients. A touch of cinnamon or nutmeg can also elevate the flavor. For a richer bread, consider substituting some of the water with milk. The possibilities are truly endless!
Frequently Asked Questions:
Can I make this Honey Oat Bread without a stand mixer?
Absolutely! While a stand mixer makes kneading easier, you can certainly knead this Honey Oat Bread dough by hand. It will take a bit more effort and time (around 10-15 minutes of vigorous kneading), but the results will be just as delicious. Make sure to develop a smooth and elastic dough.
How should I store my Honey Oat Bread?
Once cooled, store your Honey Oat Bread in an airtight container or bread bag at room temperature for up to 3-4 days. For longer storage, you can slice the bread and freeze it. This way, you can easily toast individual slices whenever you desire fresh bread.
Easy Honey Oat Bread Recipe – Soft & Delicious
A simple recipe for soft and delicious honey oat bread, perfect for any occasion.
Ingredients
-
3 cups all-purpose flour, plus extra for dusting
-
¾ cup rolled oats, plus 2 tablespoons for topping
-
2 ¼ teaspoons active dry yeast
-
1 ½ teaspoons salt
-
2 tablespoons unsalted butter, softened
-
1 cup milk
-
¼ cup lukewarm water (about 105-115°F or 40-46°C)
-
¼ cup honey, plus 2 tablespoons for topping
Instructions
-
Step 1
Activate the yeast by combining lukewarm water with honey, then sprinkle yeast on top and let it foam for 5-10 minutes. -
Step 2
In a large bowl, whisk together flour, rolled oats, and salt. Warm milk and butter separately, then add to dry ingredients along with the foamy yeast mixture. -
Step 3
Mix until a shaggy dough forms, then knead on a floured surface for 8-10 minutes until smooth and elastic. -
Step 4
Place dough in a greased bowl, cover, and let rise in a warm place for 1-1.5 hours until doubled. -
Step 5
Punch down dough, shape into a loaf or boule, and let rise for another 30-45 minutes. -
Step 6
Preheat oven to 375°F (190°C). Brush the top with water or egg wash and sprinkle with honey and oats. -
Step 7
Bake for 25-35 minutes until golden brown and hollow-sounding when tapped. Cool completely before slicing.
Important Information
Nutrition Facts (Per Serving)
It is important to consider this information as approximate and not to use it as definitive health advice.
Allergy Information
Please check ingredients for potential allergens and consult a health professional if in doubt.