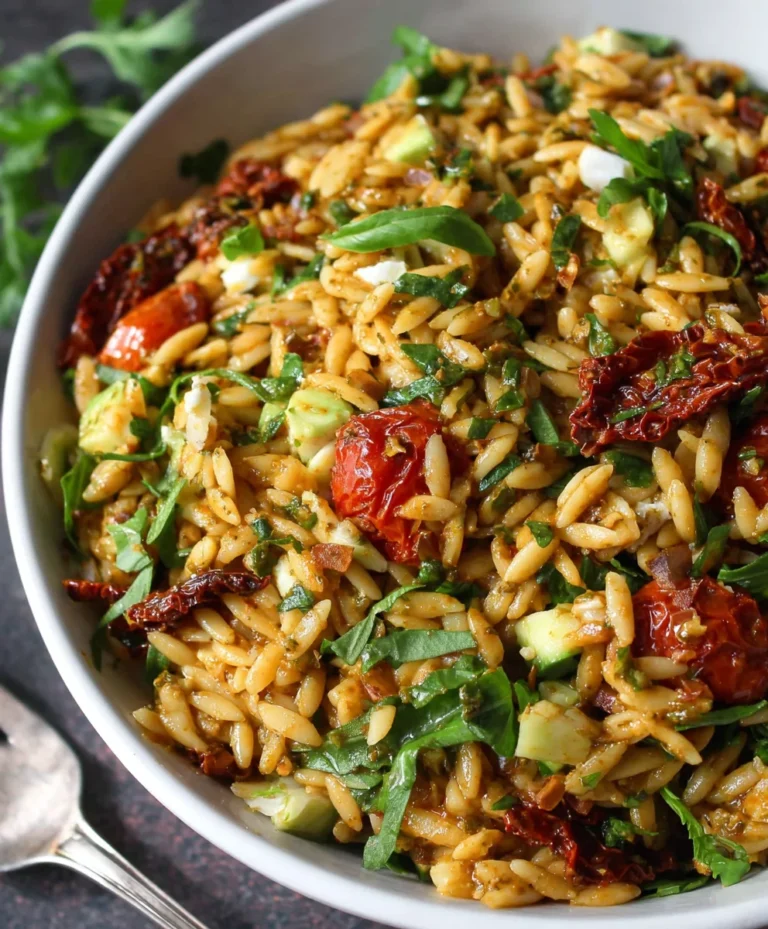
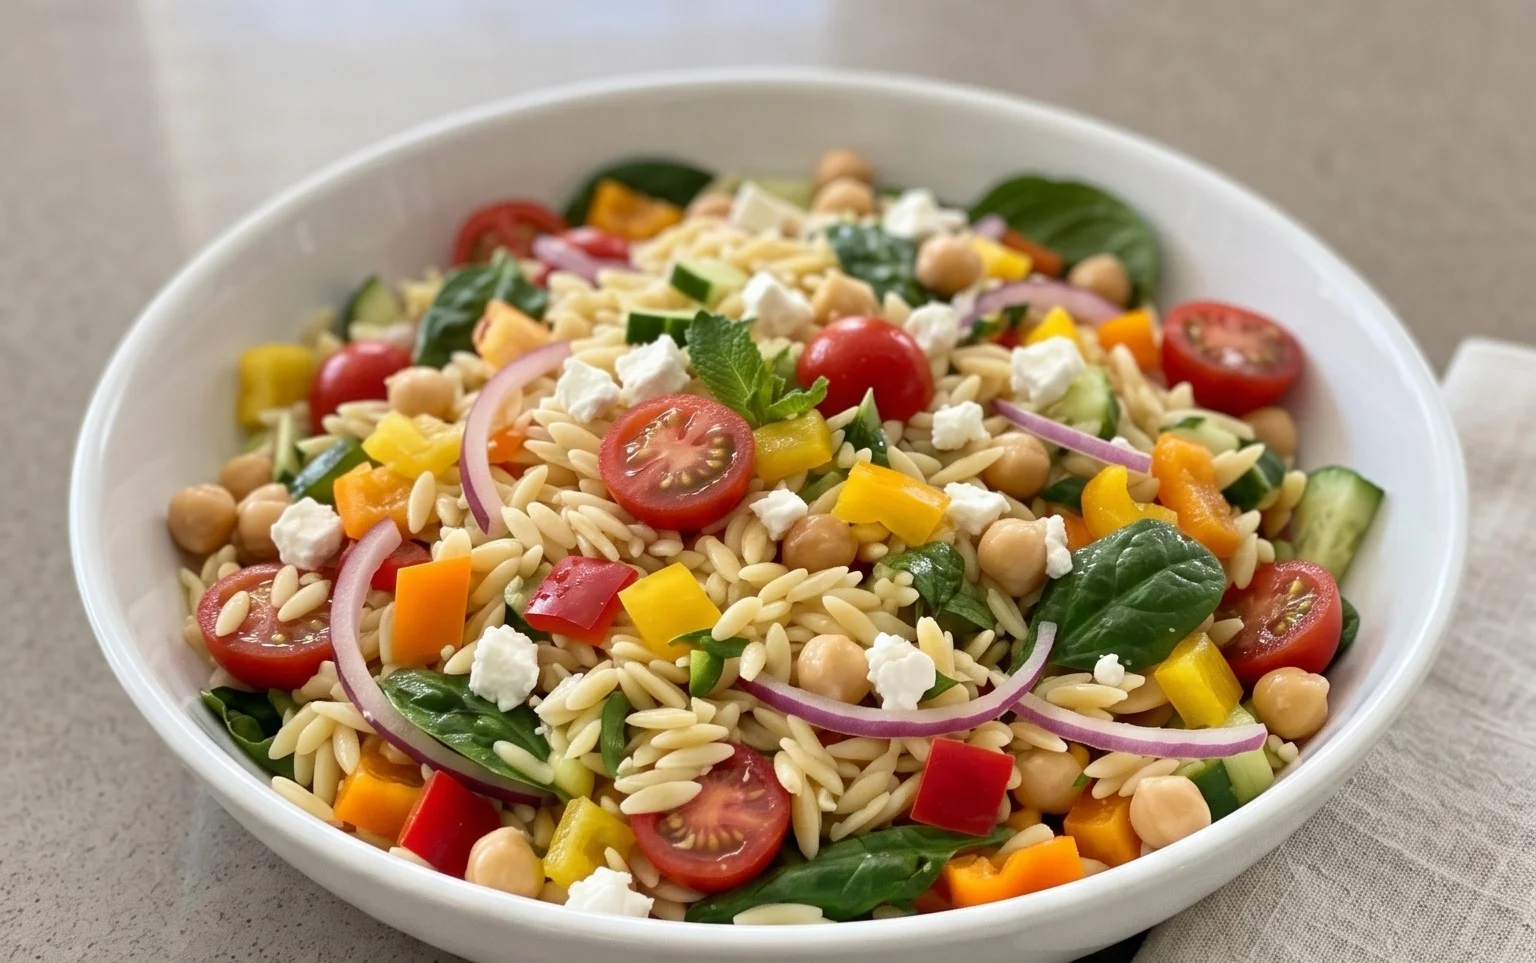
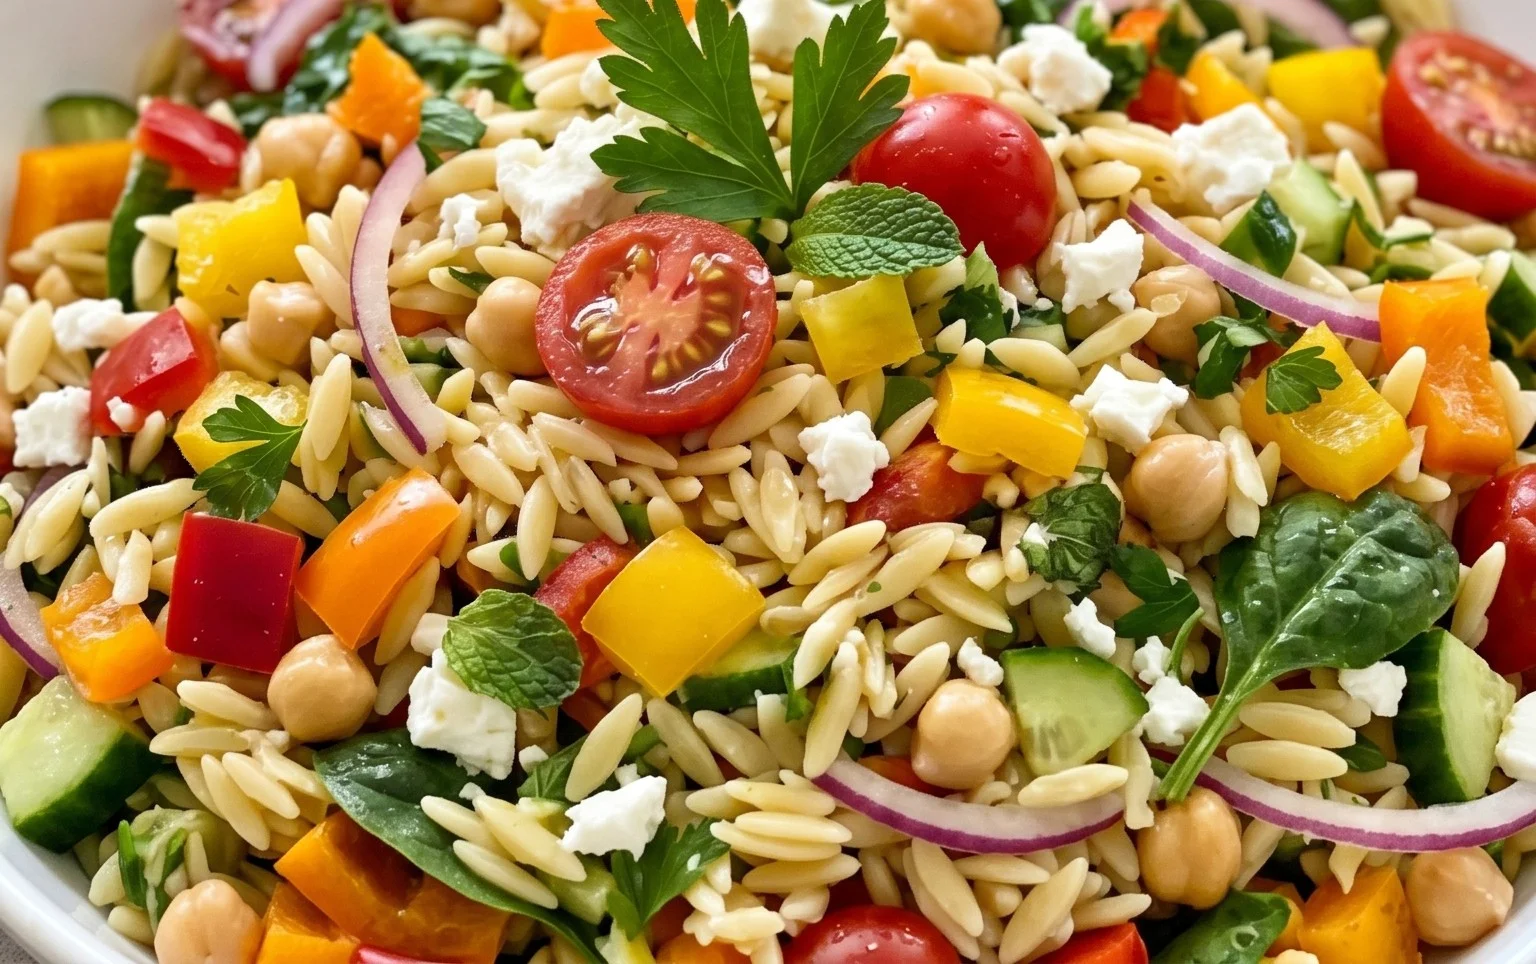
Rainbow Orzo Salad – Vibrant & Easy Recipe
Rainbow Orzo Salad is more than just a side dish; it’s a vibrant celebration on a plate! If you’re searching for a recipe that’s as beautiful as it is delicious, you’ve come to the right place. This delightful creation has quickly become a go-to for potlucks, picnics, and even weeknight dinners because it’s incredibly versatile and bursting with flavor. What makes our Rainbow Orzo Salad so special? It’s the incredible medley of colors and textures that come together harmoniously. Imagin extracte plump orzo pasta tossed with a knon-alcoholic aleidoscope of fresh, crisp vegetables, all brought together by a zesty, bright dressing. It’s the perfect balance of fresh, healthy ingredients and satisfying, light carbs, making it a crowd-pleaser for everyone from picky eaters to seasoned foodies. Get ready to impress yourself and your loved ones with this stunning and unbelievably tasty Rainbow Orzo Salad.
Ingredients:
Crafting Your Vibrant Rainbow Orzo Salad
This Rainbow Orzo Salad is more than just a side dish; it’s a celebration on a plate! Bursting with color and packed with fresh, wholesome ingredients, it’s perfect for potlucks, picnics, or simply a light and satisfying lunch. The combination of tender orzo pasta, crisp vegetables, and a zesty, herbaceous dressing creates a symphony of flavors and textures that will have everyone reaching for seconds. It’s incredibly versatile, too. Feel free to add grilled chicken or shrimp to make it a complete meal, or swap out some vegetables based on what’s in season. The key to this salad’s success lies in the freshness of its components and the balance of its dressing. Let’s get started on creating this culinary masterpiece!
Preparing the Orzo
The foundation of our Rainbow Orzo Salad is, of course, the orzo pasta. For best results, we’ll cook it al dente, meaning it will have a slight chew to it. This is crucial because the orzo will continue to absorb flavor from the dressing as it sits.
1. Bring a large pot of water to a rolling boil over high heat. Add the 1 teaspoon of salt to the boiling water. This not only seasons the pasta from within but also helps prevent it from sticking together. Carefully add the 1 1/2 cups of uncooked orzo pasta to the boiling water. Stir the orzo immediately to ensure no grains clump at the bottom of the pot. Cook according to the package directions, typically around 8-10 minutes, until it reaches that perfect al dente consistency. It’s always a good idea to taste a piece of orzo a minute or two before the suggested cooking time to check for doneness. Once cooked, drain the orzo thoroughly in a fine-mesh colander. You can rinse it briefly with cold water to stop the cooking process and prevent it from becoming mushy, especially if you aren’t assembling the salad immediately. Set the drained orzo aside to cool while you prepare the other ingredients.
Chopping the Colorful Brigade
The “rainbow” in our salad comes from the vibrant array of fresh vegetables we’ll be adding. Taking the time to chop everything evenly will ensure each bite is a delightful mix of flavors and textures.
2. Now, let’s get our colorful cast of characters ready. Finely chop 1 red bell pepper and 1 orange bell pepper. Aim for small, uniform pieces so they distribute well throughout the salad. Next, finely chop 1 english cucumber. For the cucumber, you can choose to peel it if you prefer, or leave the skin on for added nutrients and a bit of crunch. Finely chop 1 small red onion. Red onions add a lovely pungent sweetness and a beautiful pop of color. Finally, if you’re using fresh corn kernels, cut them off the cob. If you’re using frozen corn, ensure it’s thawed. You can either thaw it by leaving it out at room temperature for a bit or by running it under cool water. Having all your vegetables prepped and ready to go makes the assembly process a breeze.
Whisking Up the Zesty Dressing
The dressing is where all the flavors truly meld together. This particular dressing is bright, tangy, and herbaceous, perfectly complementing the fresh vegetables and tender orzo.
3. In a medium-sized bowl, we’ll create our magnificent dressing. Start by adding 1/4 cup of olive oil. This forms the base of our emulsion. Next, add 3 tablespoons of red grape juice vinegar. The red grape juice vinegar provides a subtle sweetness and a lovely fruitiness that distinguishes it from other vinegars. Follow this with 2 tablespoons of fresh lemon juice, which adds a wonderful zesty brightness. Now, whisk in 2 tablespoons of Dijon mustard. Dijon mustard not only adds a creamy texture but also a pleasant tang and a slight bite. Mince 2 cloves of garlic finely and add them to the bowl. The raw garlic will infuse the dressing with its pungent aroma and flavor. Finally, add 1 teaspoon of dried oregano for an earthy, aromatic note. Whisk all these ingredients together vigorously until the dressing is well combined and emulsified. You want it to be smooth and slightly thickened.
Assembling Your Masterpiece
With all our components ready, it’s time for the grand assembly! This is where the magic happens and the colors truly come alive.
4. In a large serving bowl, combine the cooled, drained orzo pasta with all the finely chopped vegetables: the red bell pepper, orange bell pepper, english cucumber, and red onion. Also, add the 1 cup of corn kernels to the bowl. Now, it’s time to introduce the fresh herbs that will elevate this salad to new heights. Gently stir in 1/3 cup of freshly chopped basil and 1/4 cup of freshly chopped parsley. These herbs are packed with fresh, aromatic flavor that will make the salad sing.
5. Pour the prepared zesty dressing evenly over the orzo and vegetable mixture. Using a large spoon or two, gently toss everything together to ensure that every single piece of orzo and every vegetable is coated with the delicious dressing. Take your time with this step; you want to distribute the flavors uniformly without bruising the delicate herbs or vegetables. Once everything is well combined, give it a final taste. You might find it needs a pinch more salt or a squeeze of lemon juice to achieve your perfect flavor profile.
Letting the Flavors Marry
This step is often overlooked, but it’s truly essential for developing the best possible flavor in any salad.
6. Once your Rainbow Orzo Salad is fully assembled and tossed, cover the bowl and refrigerate it for at least 30 minutes, or ideally, for an hour or more. This chilling time allows the flavors to meld and deepen. The orzo will absorb more of the dressing, the vegetables will soften slightly while retaining their crispness, and the herbs will release their aromatic oils. The longer it sits, the more harmonious the flavors will become. This salad is fantastic served chilled or at room temperature, making it ideal for make-ahead meals and gatherings. Enjoy the vibrant colors and incredible taste!
Conclusion:
I hope you’re as excited as I am to dive into this vibrant Rainbow Orzo Salad! This recipe truly shines because of its incredible versatility and stunning visual appeal. It’s a fantastic way to pack a ton of fresh, healthy ingredients into one delicious dish, making it perfect for picnics, potlucks, or a light and satisfying weeknight meal. The tender orzo pasta provides a wonderful base for all the colorful vegetables, and the zesty lemon-herb dressing ties everything together beautifully. Don’t be afraid to experiment and make this Rainbow Orzo Salad your own!
This salad is incredibly adaptable. Serve it chilled as a refreshing side dish alongside grilled chicken or fish, or enjoy it as a hearty main course on its own. It also makes a fantastic addition to any buffet spread. If you’re looking for variations, consider adding some crum extractbled feta cheese for a salty tang, toasted pine nuts for a delightful crunch, or even some chickpeas for extra protein. You could also swap out some of the vegetables for seasonal favorites like roasted sweet potatoes or asparagus. I truly encourage you to give this recipe a try – you won’t be disappointed!
Frequently Asked Questions:
Can I make this Rainbow Orzo Salad ahead of time?
Absolutely! This salad is actually best made a few hours ahead of time, or even the day before. This allows the flavors to meld together beautifully. I recommend keeping the dressing separate and tossing it with the salad just before serving to prevent the orzo from becoming too mushy.
What are some good protein additions to this salad?
For a more substantial meal, you can easily add grilled chicken breast, shrimp, flaked salmon, or even some hard-boiled eggs. For a vegetarian option, consider adding canned chickpeas, black beans, or some crum extractbled firm tofu.
How long will this salad last in the refrigerator?
When stored properly in an airtight container, this Rainbow Orzo Salad will keep well in the refrigerator for 3-4 days. Remember to keep the dressing separate if you plan on storing it for an extended period.
Rainbow Orzo Salad
A vibrant and refreshing orzo pasta salad packed with colorful vegetables and a zesty lemon-Dijon dressing.
Ingredients
-
1 1/2 cups uncooked orzo pasta
-
1 teaspoon salt
-
1 red bell pepper (finely chopped)
-
1 orange bell pepper (finely chopped)
-
1 english cucumber (finely chopped)
-
1 small red onion (finely chopped)
-
1 cup corn (fresh or frozen)
-
1/3 cup fresh basil (chopped)
-
1/4 cup fresh parsley (chopped)
-
1/4 cup olive oil
-
3 tablespoon red grape juice vinegar
-
2 tablespoon lemon juice (half a lemon)
-
2 tablespoon Dijon mustard
-
2 cloves garlic (minced)
-
1 teaspoon dried oregano
Instructions
-
Step 1
Cook orzo pasta according to package directions with 1 teaspoon of salt. Drain and rinse with cold water. -
Step 2
In a large bowl, combine the cooked orzo, finely chopped red bell pepper, orange bell pepper, english cucumber, and red onion. -
Step 3
Add the corn, chopped fresh basil, and chopped fresh parsley to the bowl. -
Step 4
In a separate small bowl, whisk together the olive oil, red grape juice vinegar, lemon juice, Dijon mustard, minced garlic, and dried oregano to create the dressing. -
Step 5
Pour the dressing over the orzo and vegetable mixture. Toss gently to combine all ingredients. -
Step 6
Chill for at least 15 minutes before serving to allow flavors to meld.
Important Information
Nutrition Facts (Per Serving)
It is important to consider this information as approximate and not to use it as definitive health advice.
Allergy Information
Please check ingredients for potential allergens and consult a health professional if in doubt.