Fried Jalapeno Popper Bites-Easy Appetizer
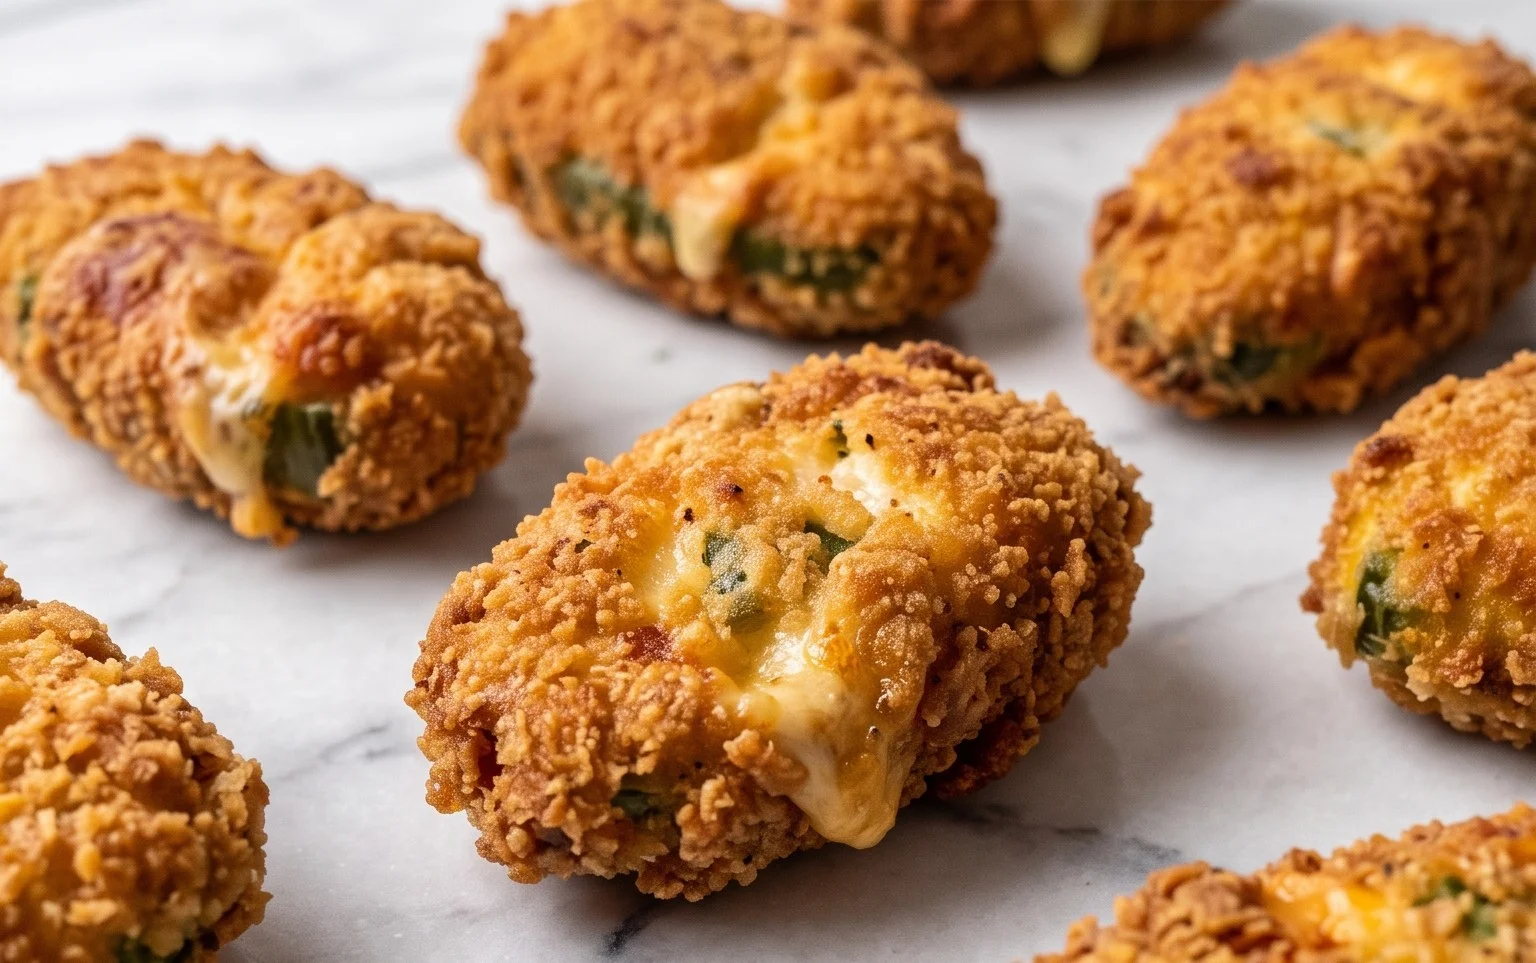
Fried Jalapeno Popper Bites are the ultimate crowd-pleaser, guaranteed to disappear faster than you can say “spicy!” There’s something undeniably magical about the way these little flavor bombs explode in your mouth. We’re talking about that irresistible combination: the creamy, tangy cheese filling, the smoky hint of beef bacon (if you choose to add it!), and of course, the satisfying kick of fresh jalapeno. But what truly elevates these Fried Jalapeno Popper Bites beyond the ordinary is their perfectly crispy, golden-brown exterior. Each bite offers a delightful textural contrast, a symphony of crunchy, creamy, and spicy that keeps you coming back for more. They’re perfect for game days, parties, or just a Tuesday night when you need a serious flavor upgrade.
Get ready to fall in love.
Fried Jalapeno Popper Bites
Get ready to elevate your appetizer game with these incredibly addictive Fried Jalapeno Popper Bites! Forget the traditional stuffed jalapenos; these little flavor bombs offer all the creamy, spicy, cheesy goodness you love, but in a perfectly poppable, crispy package. They’re a guaranteed hit at parties, game nights, or honestly, just for satisfying a serious craving. The perfect balance of heat from the jalapenos, creamy richness from the cheese, and a satisfying crunch from the double-coated exterior makes these irresistible. I’ve been tweaking this recipe for a while, and I think I’ve finally perfected it to deliver maximum flavor and an amazing texture. Let’s dive in!
Ingredients:
Preparing the Filling
The heart of these popper bites lies in their incredibly flavorful and creamy filling. We start by bringin extractg together the key players that will deliver that classic jalapeno popper taste with a little extra kick.
1. In a medium bowl, combine the softened cream cheese and shredded pepper jack cheese. Using softened cream cheese is crucial here; it will make it much easier to mix and achieve a smooth, homogenous texture without any lumps. You can leave the cream cheese out on the counter for about an hour, or gently microwave it in 15-second bursts, being careful not to melt it. Once the cheeses are in the bowl, use a sturdy spoon or a spatula to really work them together until they are well combined and creamy.
2. Next, add the seeded and finely diced jalapenos to the cheese mixture. Remember to wear gloves when handling jalapenos to avoid any irritation to your skin or eyes. Seeding them also helps control the level of heat, so adjust the amount of jalapeno or seeds left in according to your spice preference. For those who love a little more heat, you can leave some of the seeds in, or even add a touch more jalapeno. This is also where the chopped beef beef bacon comes in. The savory, smoky flavor of the beef beef bacon adds a fantastic depth and a delightful chewy texture to the filling. Stir in the beef beef bacon, ensuring it’s evenly distributed throughout the cheese and jalapeno mixture.
3. For that signature spicy kick and a touch of sweet heat, we’ll add the sriracha sauce. Stir in the 2 tablespoons of sriracha sauce. The sriracha not only enhances the spice but also adds a beautiful vibrant color to the filling. Mix everything thoroughly until all the ingredients are well incorporated. The consistency should be a thick, spreadable mixture. You can taste a tiny bit at this stage (if you dare!) and adjust seasonings if needed, though the cheeses and sriracha usually provide plenty of flavor.
Forming and Breading the Bites
Now that we have our delicious filling ready, it’s time to shape them into bite-sized portions and get them ready for their crispy coating.
4. Once your filling is thoroughly mixed, it’s time to form the bites. You can use a small cookie scoop, or simply use your hands (lightly greased if you find the mixture too sticky) to roll the filling into small, bite-sized balls, roughly 1 inch in diameter. Don’t make them too large, as they need to be manageable for frying and for popping in your mouth! Place the formed balls onto a baking sheet lined with parchment paper. As you form them, you might notice they are quite soft. This is perfectly normal. For best results and to ensure they hold their shape during frying, I highly recommend chilling these formed bites in the refrigerator for at least 30 minutes, or in the freezer for about 15 minutes. This will firm them up considerably, making them much easier to handle during the breading process.
5. This next step is where we achieve that coveted golden-brown crunch. Set up your breading station with three shallow dishes. In the first dish, place the all-purpose flour. In the second dish, whisk together the two beaten eggs. In the third dish, combine the panko bread crum extractbs, plain bread crum extractbs, garlic powder, cayenne pepper, black pepper, and salt. The panko bread crum extractbs are key here for that extra crispiness, while the plain bread crum extractbs provide a good base. The garlic powder, cayenne, and black pepper add a subtle layer of savory spice that complements the filling beautifully.
6. Now, working with your chilled popper bites, carefully roll each ball first in the flour, tapping off any excess. This initial flour coating helps the egg wash adhere better. Next, dip the floured ball into the beaten eggs, ensuring it’s fully coated. Let any excess egg drip off. Finally, roll the egg-coated ball generously in the bread crum extractb mixture, pressing gently to make sure the crum extractbs stick well. Ensure each bite is completely covered. You want a thick, even coating for maximum crispiness. If you want an extra-thick crust, you can double-bread them: dip them back into the egg and then into the bread crum extractb mixture again. Place the breaded bites back onto the parchment-lined baking sheet. Repeat this process for all your popper bites.
Frying to Perfection
The final stage is where the magic happens – transforming these breaded bites into golden, crispy delights.
7. When you’re ready to fry, heat about 2-3 inches of peanut oil or canola oil in a heavy-bottomed pot or a deep fryer to 350°F (175°C). It’s important to maintain a consistent oil temperature for even cooking and to prevent the bites from becoming greasy. If the oil is too cool, they’ll absorb too much oil; if it’s too hot, they’ll burn on the outside before the inside is heated through. Use a thermometer to monitor the temperature. Carefully add the breaded popper bites to the hot oil, working in batches to avoid overcrowding the pot. Overcrowding will lower the oil temperature, leading to soggy results.
8. Fry the bites for 2-4 minutes, or until they are a deep golden brown and appear puffed up and crispy. They cook relatively quickly, so keep a close eye on them. Use a slotted spoon or a spider strainer to carefully remove the fried popper bites from the oil. Place them on a wire rack set over a baking sheet lined with paper towels to drain any excess oil. This is a much better method than just draining them on paper towels directly, as it allows air to circulate, keeping the bottoms crispy.
Serve these incredible Fried Jalapeno Popper Bites immediately while they are hot and crispy for the ultimate experience. They are fantastic on their own, or you can serve them with your favorite dipping sauces like ranch, sour cream, or a zesty salsa. Enjoy every explosive bite of flavor!

Conclusion:
And there you have it – the ultimate guide to creating perfect Fried Jalapeno Popper Bites! I’m so excited for you to try this recipe because it truly delivers on flavor and texture. The creamy, cheesy filling perfectly complements the slight kick from the jalapeños, all encased in a wonderfully crispy golden shell. These bites are incredibly versatile and make for an unforgettable appetizer, snack, or even a fun addition to game day spreads. Don’t hesitate to experiment with different cheeses or seasonings to put your own unique spin on them. I encourage you to gather your ingredients and whip up a batch of these delicious fried jalapeno popper bites – you won’t be disappointed!
Frequently Asked Questions:
Can I make these ahead of time?
Yes, you absolutely can! You can prepare the jalapeno popper bites up to the point of frying and store them in a single layer on a baking sheet lined with parchment paper in the refrigerator for up to 24 hours. Once you’re ready to serve, fry them directly from the fridge, adding a minute or two to the cooking time if needed.
What’s the best way to serve these?
These fried jalapeno popper bites are fantastic on their own, but they also pair wonderfully with a variety of dipping sauces. Classic choices include ranch dressing, sour cream, or a zesty chipotle aioli. For a sweeter contrast, a honey mustard sauce can also be a delightful option. They’re also great served alongside a crisp salad for a more complete meal.
Can I bake instead of frying?
While frying yields the crispiest results, baking is a healthier alternative. To bake, place the prepared bites on a baking sheet lined with parchment paper and bake in a preheated oven at 400°F (200°C) for about 15-20 minutes, flipping halfway through, until golden brown and heated through. They won’t be quite as crispy as fried, but they’ll still be delicious!
Fried Jalapeno Popper Bites
Crispy and cheesy fried jalapeno popper bites, a crowd-pleasing appetizer.
Ingredients
-
8 oz cream cheese, softened
-
2 cup shredded pepper jack cheese
-
3 jalapenos, seeded and diced
-
¼ cup chopped beef bacon
-
2 tbsp sriracha sauce
-
½ cup all purpose flour
-
½ cup panko breadcrumbs
-
½ cup plain breadcrumbs
-
1 tsp garlic powder
-
½ tsp cayenne pepper
-
¼ tsp black pepper
-
¼ tsp salt
-
2 eggs, beaten
-
Peanut oil or canola oil, for frying
Instructions
-
Step 1
In a medium bowl, combine the softened cream cheese, shredded pepper jack cheese, diced jalapenos, chopped beef bacon, and sriracha sauce. Mix until well combined. -
Step 2
Roll the mixture into small bite-sized balls (about 1 inch in diameter). -
Step 3
Set up a dredging station. In one shallow dish, place the all-purpose flour. In a second shallow dish, whisk the beaten eggs. In a third shallow dish, combine the panko breadcrumbs, plain breadcrumbs, garlic powder, cayenne pepper, black pepper, and salt. -
Step 4
Dredge each cheese ball first in the flour, shaking off excess. Then dip into the beaten egg, allowing excess to drip off. Finally, coat thoroughly in the breadcrumb mixture, pressing gently to adhere. -
Step 5
Heat about 2 inches of peanut oil or canola oil in a deep pot or Dutch oven over medium-high heat to 350°F (175°C). -
Step 6
Carefully fry the coated cheese balls in batches, being careful not to overcrowd the pot, for about 2-3 minutes per side, or until golden brown and heated through. -
Step 7
Remove the fried bites with a slotted spoon and place them on a paper towel-lined plate to drain excess oil.
Important Information
Nutrition Facts (Per Serving)
It is important to consider this information as approximate and not to use it as definitive health advice.
Allergy Information
Please check ingredients for potential allergens and consult a health professional if in doubt.