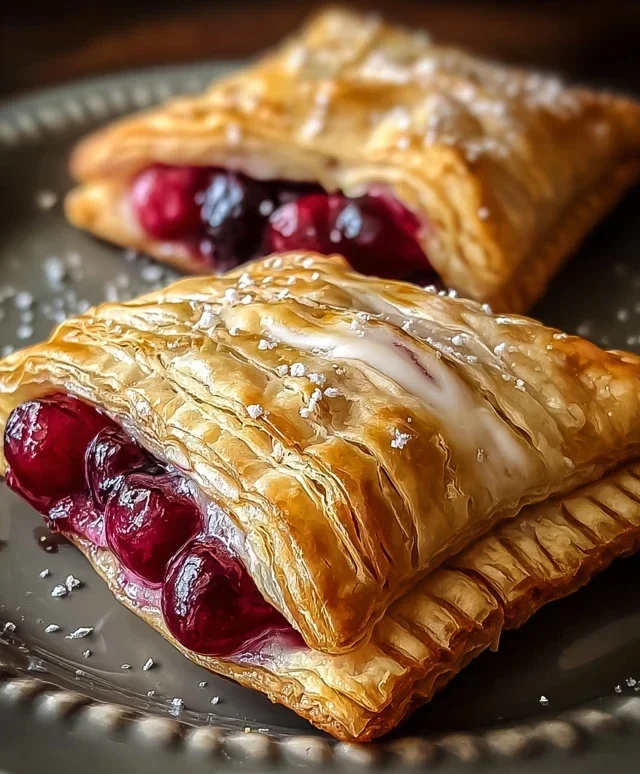
Easy Cherry Turnovers – Quick & Delicious Pastry Recipe
Easy Cherry Turnovers are a delightful treat that whispers of summer picnics and cozy afternoons. There’s something inherently comforting about flaky pastry embracing a burst of sweet, tart cherry filling. These aren’t your grandmother’s fussy pastries; our recipe is designed for simplicity, proving that impressive desserts don’t need to be complicated. We love them because they deliver pure, unadulterated joy in every bite – a perfect balance of buttery, golden crust and vibrant, juicy fruit. What makes these easy cherry turnovers truly special is their versatility. Enjoy them warm with a scoop of vanilla ice cream for an indulgent dessert, or have them at room temperature with a cup of tea for a delightful afternoon pick-me-up. Get ready to impress yourself and your loved ones with this wonderfully achievable recipe!
Easy Cherry Turnovers
There’s something incredibly comforting about a warm, flaky pastry filled with sweet, tart cherries. These easy cherry turnovers are a delightful treat that feels special enough for company but is simple enough for a weeknight craving. They come together surprisingly quickly, especially when using store-bought puff pastry, which is a true game-changer for busy home bakers. The golden, buttery layers of puff pastry perfectly complement the burst of cherry flavor within. Whether you’re serving them for breakfast, dessert, or even a mid-afternoon pick-me-up, these turnovers are sure to be a hit. They’re also incredibly versatile – if you don’t have cherries, feel free to experiment with other fruit pie fillings like apple or blueberry. Let’s get baking!
Ingredients:
Preparing Your Turnovers
The first step to creating these delightful pastries is to ensure your puff pastry is properly thawed. This is crucial for achieving that signature flaky texture. Refer to the package instructions for the best thawing method, but typically, this involves leaving the pastry at room temperature for about 30-40 minutes, or in the refrigerator overnight. You want the pastry to be pliable and easy to unfold without cracking, but not so warm that it becomes sticky and difficult to handle.
Once thawed, gently unfold the puff pastry sheets onto a lightly floured surface. If the sheets are very large, you might want to trim them slightly to make them more manageable. We’ll be cutting these into squares to form our turnovers. Aim for roughly 4-inch by 4-inch squares. You should be able to get about 6 squares from each sheet of puff pastry, giving you a total of 12 turnovers. Don’t worry too much about perfect symmetry; rustic charm is part of their appeal!
Next, let’s prepare our egg wash. In a small bowl, whisk together the large egg and 1 tablespoon of milk. This mixture will be brushed onto the turnovers before baking, which helps them achieve a beautiful golden-brown color and a slightly glossy finish.
Now, it’s time to assemble the filling. If you’re using canned cherry pie filling, give it a good stir to ensure the cherries are evenly distributed and the filling isn’t too watery. If it seems exceptionally liquidy, you can let it drain for a few minutes in a fine-mesh sieve. If you’re using fresh cherries, you’ll want to pit them and toss them with a bit of sugar and cornstarch to create a similar consistency to pie filling.
Assembling and Baking
1. Portioning the Filling: Take each puff pastry square and place about 1 to 2 tablespoons of the cherry pie filling onto one half of the square, leaving a small border around the edges. Be careful not to overfill the turnovers, as this can cause the filling to leak out during baking and create a mess. A little goes a long way!
2. Sealing the Turnovers: Gently fold the other half of the puff pastry square over the filling to create a triangle. Press the edges firmly together with your fingers to seal them. For an extra secure seal and a decorative touch, you can use the tines of a fork to crimp the edges. This not only prevents the filling from escaping but also gives your turnovers a classic appearance.
3. Creating Vents and Applying Egg Wash: Before baking, it’s important to create a few small vents in the top of each turnover. This allows steam to escape during the baking process, preventing the pastry from puffing up too much and potentially bursting. You can make a small slit or two with the tip of a sharp knife. Once vented, carefully brush the tops of each turnover with the prepared egg wash. This will give them that lovely golden sheen as they bake.
4. Baking to Perfection: Arrange the prepared turnovers on a baking sheet lined with parchment paper. This prevents sticking and makes for easier cleanup. Preheat your oven to 400°F (200°C). Bake for 15-20 minutes, or until the puff pastry is golden brown and puffed up beautifully. Keep an eye on them towards the end of the baking time, as puff pastry can brown quickly.
Glazing the Turnovers
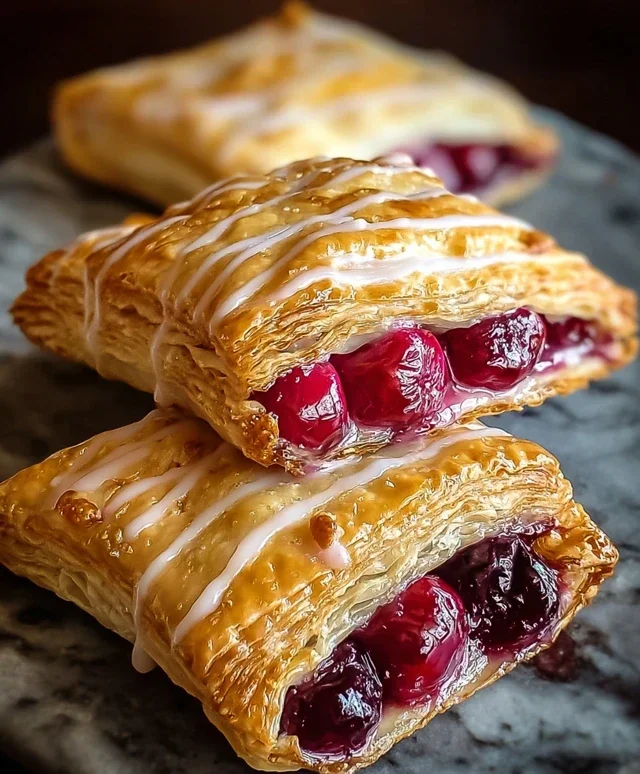
While the turnovers are still warm, let’s prepare a simple glaze to enhance their flavor and appearance even further. In a small bowl, whisk together 1 cup of powdered sugar, 1 teaspoon of vanilla extract, and 2-3 tablespoons of milk. Start with 2 tablespoons of milk and add more gradually until you achieve a smooth, pourable consistency. You want it thick enough to coat the turnovers but thin enough to drizzle easily.
Once the turnovers have cooled slightly (they should still be warm enough for the glaze to melt slightly and adhere nicely), drizzle the glaze generously over the tops. You can use a spoon or a piping bag for a more controlled application. The warmth of the turnovers will help the glaze set slightly. For an extra touch of sweetness and visual appeal, you can dust them with a little more powdered sugar before the glaze fully sets, or after it has dried.
These easy cherry turnovers are best enjoyed warm, perhaps with a scoop of vanilla ice cream or a dollop of whipped cream. They are a wonderful treat for any occasion, proving that delicious and impressive desserts don’t always require a lot of fuss. Enjoy the fruits of your labor!
Conclusion:
There you have it! These easy cherry turnovers are truly a delight, perfect for begin extractners and experienced bakers alike. Their flaky pastry, bursting with sweet and slightly tart cherry filling, makes them an incredibly satisfying treat without any fuss. They’re versatile enough for a simple breakfast, a charming afternoon tea, or a crowd-pleasing dessert. I really encourage you to give this recipe a try – I’m confident you’ll be delighted with the results!
To make them even more special, consider serving your warm turnovers with a dusting of powdered sugar, a scoop of vanilla ice cream, or a dollop of whipped cream. If you’re feeling adventurous, you can also swap out the cherries for other fruits like blueberries, raspberries, or even a mix of berries. A pinch of cinnamon or a splash of almond extract in the filling can also add an exciting new dimension.
Frequently Asked Questions:
Can I make the pastry dough from scratch?
Absolutely! While this recipe uses store-bought puff pastry for ultimate ease, you can certainly make your own pie crust or rough puff pastry from scratch if you prefer. Just ensure it’s chilled and ready to go before you begin extract assembling the turnovers.
How should I store leftover cherry turnovers?
Leftover turnovers can be stored in an airtight container at room temperature for up to two days. For longer storage, they can be kept in the refrigerator. Reheat them gently in a warm oven to revive their flaky texture.
What if I don’t have fresh cherries?
No problem! You can easily use frozen or canned cherries. If using frozen, ensure they are thawed and drained well to avoid a soggy filling. If using canned, drain them thoroughly and adjust the sugar according to their sweetness.
Easy Cherry Turnovers
Simple and delicious cherry turnovers made with puff pastry.
Ingredients
-
1 package puff pastry (2 sheets), thawed
-
1 cup cherry pie filling (fresh or canned)
-
1 large egg
-
1 tablespoon milk
-
1 cup powdered sugar
-
1 teaspoon vanilla extract
-
2-3 tablespoons milk
-
Additional powdered sugar for dusting
Instructions
-
Step 1
Preheat oven to 400°F (200°C). Line a baking sheet with parchment paper. -
Step 2
Unfold the thawed puff pastry sheets on a lightly floured surface. Cut each sheet into 4 equal squares. -
Step 3
Spoon about 2 tablespoons of cherry pie filling into the center of each puff pastry square, leaving a small border. -
Step 4
In a small bowl, whisk together the egg and 1 tablespoon of milk. Brush the edges of the puff pastry with the egg wash. -
Step 5
Fold each square in half diagonally to form a triangle, pressing the edges to seal. Crimp with a fork if desired. -
Step 6
Place the turnovers on the prepared baking sheet. Cut a small slit in the top of each turnover to allow steam to escape. -
Step 7
Bake for 15-20 minutes, or until golden brown and puffed. -
Step 8
While the turnovers are baking, prepare the glaze: whisk together 1 cup of powdered sugar, 1 teaspoon vanilla extract, and 2-3 tablespoons of milk until smooth and pourable. Add more milk if needed for desired consistency. -
Step 9
Let the turnovers cool slightly on a wire rack. Drizzle with the glaze and dust with additional powdered sugar if desired.
Important Information
Nutrition Facts (Per Serving)
It is important to consider this information as approximate and not to use it as definitive health advice.
Allergy Information
Please check ingredients for potential allergens and consult a health professional if in doubt.