Easter Bunny Coconut Tails – Easy Treat Recipe
Easter Bunny Coconut Tails are a delightful treat that brings a whimsical charm to any spring celebration. As soon as Easter rolls around, my kitchen fills with the sweet, tropical scent of toasted coconut, and these adorable little tails are always a star attraction. What is it about these sweet, no-bake wonders that captures everyone’s heart? I think it’s their simple elegance, the satisfying chew of the coconut, and of course, their absolutely irresistible bunny-like appearance! They’re incredibly easy to make, which means more time for enjoying family and less time fussing in the kitchen, making them a perfect activity for little hands too. This year, let’s hop into Easter with these charming Easter Bunny Coconut Tails – they’re guaranteed to bring smiles to faces both young and old.
Easter Bunny Coconut Tails
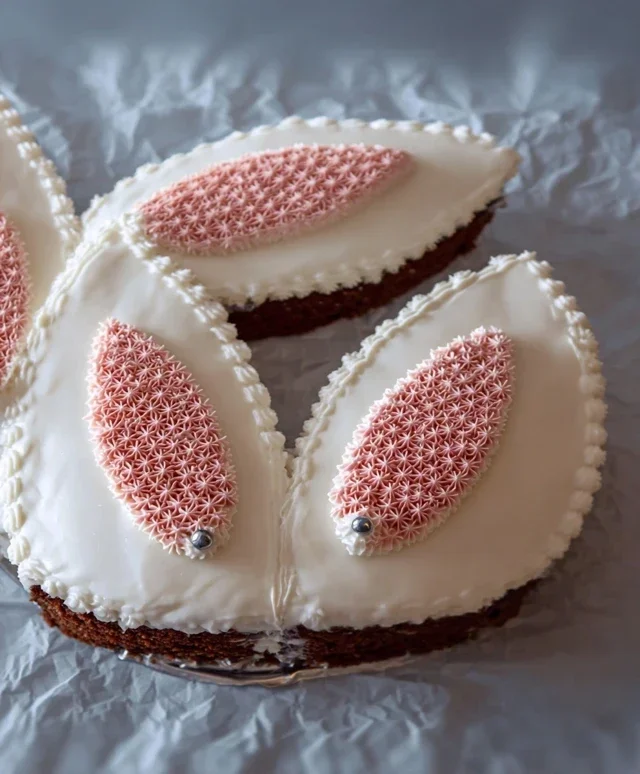
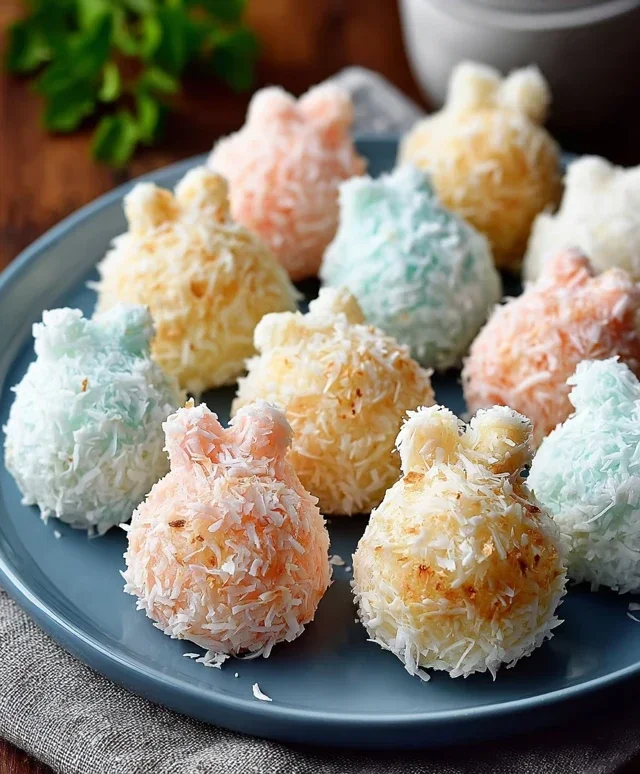
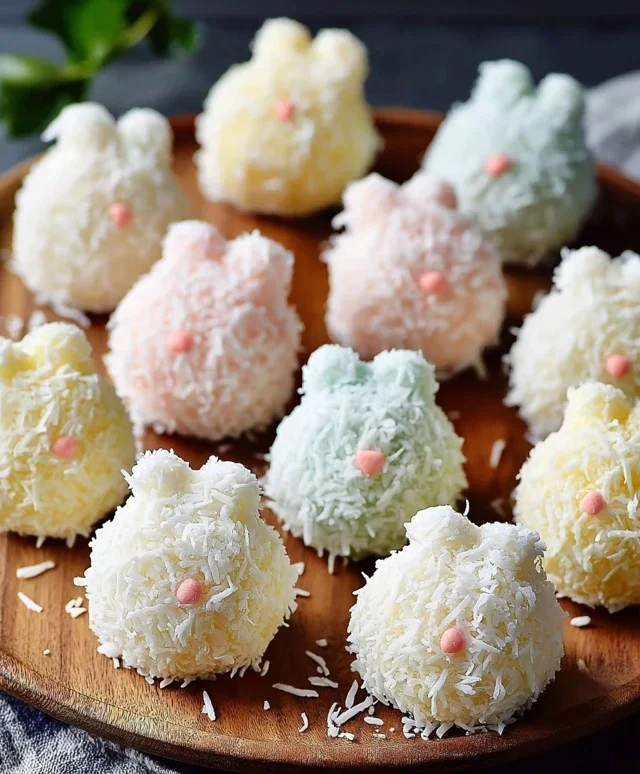
Get ready for a truly adorable and delicious Easter treat! These Easter Bunny Coconut Tails are incredibly easy to make, surprisingly simple, and guaranteed to bring smiles to faces of all ages. Imagin extracte fluffy, sweet coconut confections dipped in creamy white chocolate and adorned with the sweetest pink bunny ears. They look just like tiny, delightful bunny tails, perfect for an Easter basket, a festive dessert table, or just a fun springtime baking project. We’re going to use some fantastic ingredients to bring these little wonders to life, and you’ll find yourself making them year after year. Let’s dive into creating these little bursts of Easter joy!
Ingredients:
Crafting the Coconut Tails
This is where the magic really begin extracts, transforming simple ingredients into our fluffy coconut bases. It’s a straightforward process, but paying attention to a few details will ensure perfect texture and flavor.
1. Melting the Foundation: In a medium, microwave-safe bowl, combine the shredded coconut, mini marshmallows, and butter. This trio will form the heart of our coconut tails. Place the bowl in the microwave and heat in 30-second intervals, stirring well after each interval. Continue this process until the marshmallows are completely melted and the mixture is smooth and well-combined. Be patient; you don’t want to scorch the marshmallows. The heat will gently melt them into a sticky, cohesive mass that binds the coconut together. Once everything is melted and you have a unified mixture, carefully remove the bowl from the microwave.
2. Infusing with Flavor: Now it’s time to add that wonderful hint of sweetness and aroma. Stir the vanilla extract into the warm marshmallow and coconut mixture. Mix it thoroughly until the vanilla is evenly distributed throughout. This step is crucial for adding depth to the overall flavor profile of our bunny tails. The warmth of the mixture helps to release the fragrant oils in the vanilla, making your kitchen smell absolutely delightful.
3. Shaping the Tails: Allow the mixture to cool for a few minutes. It will still be sticky, but cool enough to handle. This is where you’ll get your hands a little messy, but it’s part of the fun! Lightly grease your hands with a little bit of cooking spray or butter to prevent sticking. Take small portions of the coconut mixture – about a tablespoon at a time – and roll them into oval or slightly flattened ball shapes, resembling little bunny tails. The size is up to you, but aiming for a consistent size will make for a more uniform and attractive final presentation. Place the shaped coconut tails onto a baking sheet lined with parchment paper. Ensure they aren’t touching each other too much, as they might stick together when they firm up.
4. Setting the Tails: Once all your coconut tails are shaped and ready, it’s time to let them set and firm up. You can leave them at room temperature for about 30-60 minutes, or to speed things up, place the baking sheet in the refrigerator for about 15-20 minutes. They just need to be firm enough to handle without losing their shape when you dip them in chocolate. This chilling process is important; if they are too soft, they might crum extractble or break when you attempt to dip them.
The White Chocolate Dip and Decoration
This is the glamorous finishing touch that truly elevates our coconut tails into irresistible Easter treats. The smooth, creamy white chocolate coating adds a delightful crunch and sweetness.
5. Melting the White Chocolate: In a separate microwave-safe bowl, add the white chocolate chips. Microwave them in 30-second intervals, stirring thoroughly after each interval, until the chocolate is smooth and completely melted. White chocolate can be a bit more sensitive to heat than milk or dark chocolate, so be extra careful not to overheat or scorch it. If you find it’s still a little thick even after melting, you can add a teaspoon of vegetable shortening or coconut oil to help thin it out, making it easier to dip.
6. Dipping and Decorating: Now for the fun part! Using a fork or a toothpick, carefully dip each firm coconut tail into the melted white chocolate, ensuring it’s fully coated. Let any excess chocolate drip back into the bowl. Place the dipped tails back onto the parchment-lined baking sheet.
7. Adding the Bunny Ears: While the white chocolate is still wet, it’s time to create the adorable bunny ears. For this, you’ll use the pink candy melts. Melt the pink candy melts according to their package directions, usually in the microwave in short intervals, stirring until smooth. Transfer the melted pink candy melts into a small piping bag with a very small tip, or a zip-top bag with a tiny corner snipped off. Carefully pipe two small, elongated oval shapes onto the top of each white chocolate-dipped coconut tail to resemble bunny ears. You can make them slightly curved or pointed. Work quickly, as the white chocolate will start to set.
8. Setting the Decorations: Allow the white chocolate and candy melt decorations to set completely. This will take about 30-60 minutes at room temperature, or you can speed up the process by placing them back in the refrigerator for 10-15 minutes. Once they are firm to the touch, your delightful Easter Bunny Coconut Tails are ready to be enjoyed! They are best stored in an airtight container at room temperature.
Conclusion:
So there you have it – your guide to creating adorable and delicious Easter Bunny Coconut Tails! I truly hope you’ll give this recipe a try. It’s a fantastic way to add a touch of homemade charm and delightful flavor to your Easter celebrations. These little treats are not only visually appealing, making them a hit with kids and adults alike, but they also boast a wonderful balance of sweet coconut and a hint of creamy goodness. They’re surprisingly easy to whip up, perfect for a fun family baking activity or a last-minute addition to your dessert table. Don’t be afraid to get creative with the decorating – sprinkles, edible glitter, or even tiny candy eyes can elevate their Easter bunny charm even further!
I recommend serving these Easter Bunny Coconut Tails alongside a variety of other Easter goodies, like pastel-colored cupcakes or a fresh fruit salad. They also make delightful edible gifts for friends and neighbors. For those who love to experiment, consider adding a touch of lemon zest to the coconut mixture for a brighter flavor, or dipping them in melted dark chocolate for a richer profile. The possibilities are truly endless with these versatile little delights. So, go ahead, embrace the festive spirit, and bake up some joy with these delightful Easter Bunny Coconut Tails!
Frequently Asked Questions:
Q: Can I make these ahead of time?
Absolutely! You can prepare the coconut mixture and shape the tails a day or two in advance. Store them in an airtight container in the refrigerator. Decorate them closer to serving time for the freshest appearance.
Q: What if I don’t have shredded coconut? Can I use something else?
While shredded coconut is key to the texture and flavor of these Easter Bunny Coconut Tails, you could try finely chopped almonds or desiccated coconut as an alternative. However, the distinct coconut flavor and texture will be altered.
Q: How should I store any leftovers?
Leftover Easter Bunny Coconut Tails can be stored in an airtight container at room temperature for a couple of days. If your kitchen is particularly warm, or if they contain any dairy that might spoil, refrigerating them is a safer bet. Just be aware that refrigeration might slightly firm them up.
Easter Bunny Coconut Tails
Delightful no-bake coconut treats shaped like bunny tails, perfect for Easter.
Ingredients
-
2 cups shredded coconut
-
1½ cups mini marshmallows
-
¼ cup butter
-
1 teaspoon vanilla extract
-
1 cup white chocolate chips
-
Pink candy melts for decoration
Instructions
-
Step 1
In a microwave-safe bowl, combine mini marshmallows and butter. Microwave in 30-second intervals, stirring in between, until melted and smooth. -
Step 2
Stir in the vanilla extract and shredded coconut until well combined. -
Step 3
Let the mixture cool slightly, then shape it into small, oval “bunny tails” with your hands. Place on parchment paper. -
Step 4
Melt white chocolate chips according to package directions (microwave or double boiler). Dip one end of each coconut tail into the white chocolate. -
Step 5
Place the dipped tails back on parchment paper and let the chocolate set. -
Step 6
Melt pink candy melts according to package directions. Drizzle or dot the pink candy melts onto the white chocolate-dipped end to resemble a bunny tail’s inner ear or the tip of the tail. -
Step 7
Allow the candy melts to harden completely before serving.
Important Information
Nutrition Facts (Per Serving)
It is important to consider this information as approximate and not to use it as definitive health advice.
Allergy Information
Please check ingredients for potential allergens and consult a health professional if in doubt.