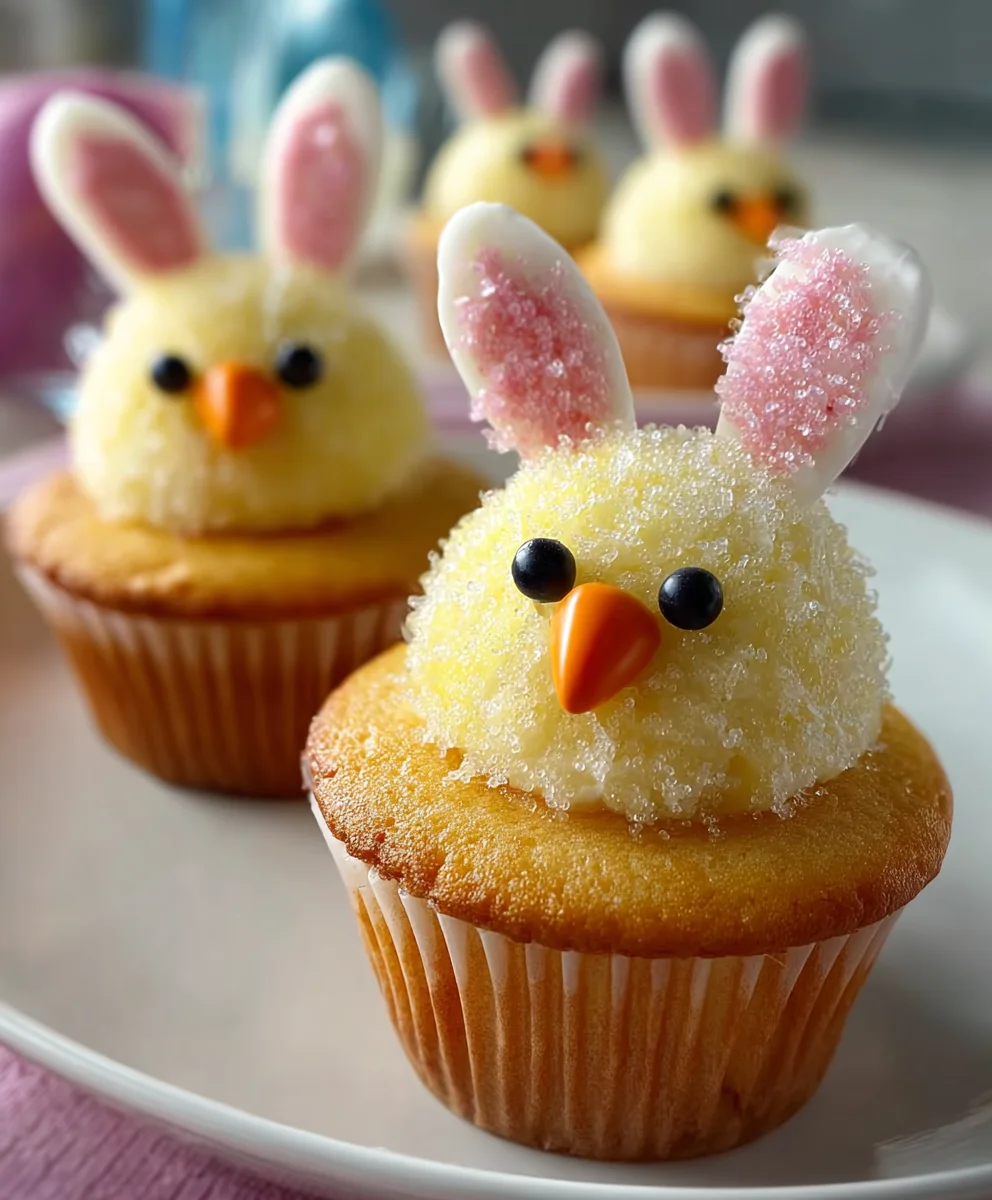
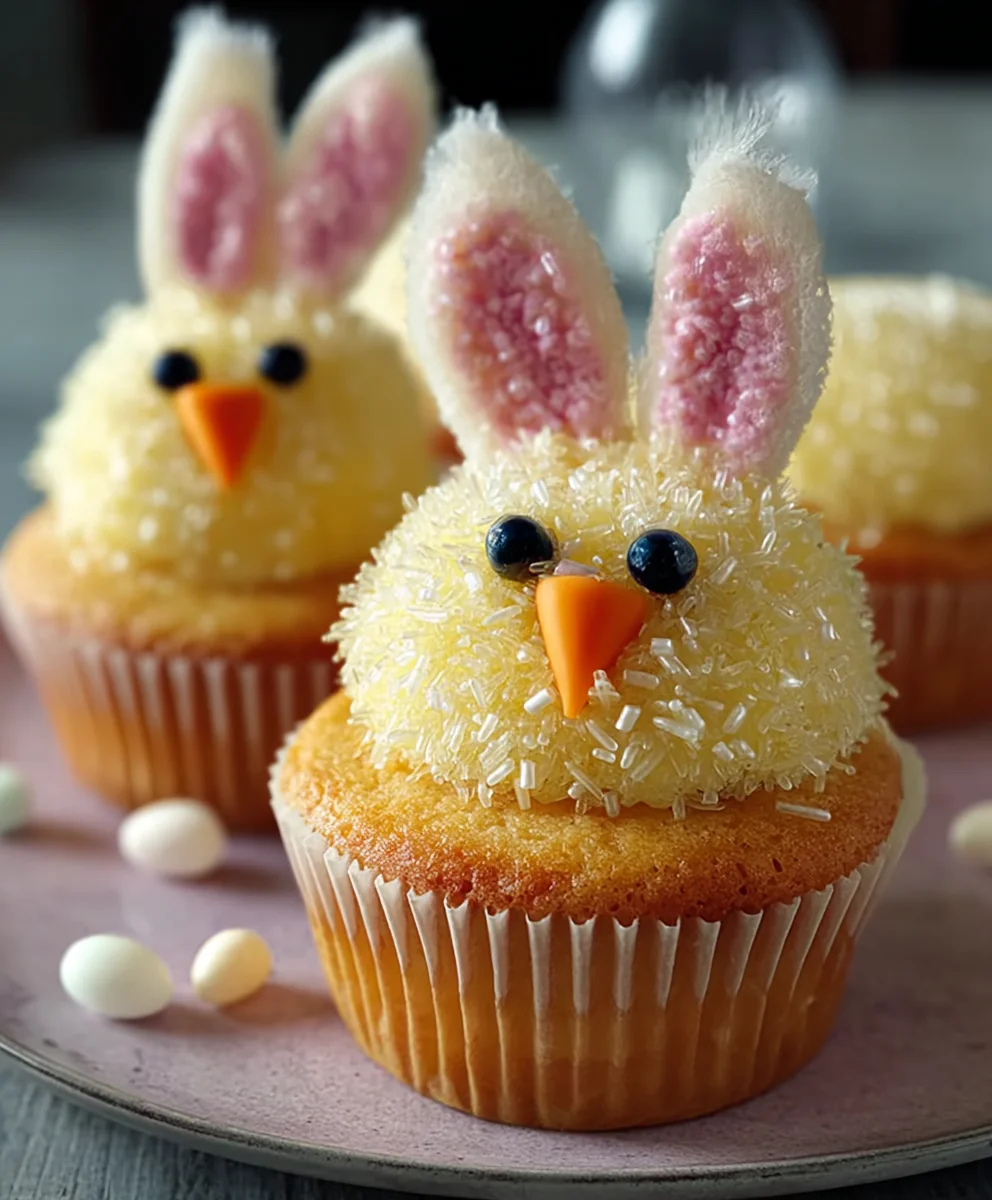
Easter Bunny Chick Cupcakes-Fun Sweet Treat
Easter Bunny and Chick Cupcakes are an absolute delight, bringin extractg a burst of springtime cheer and deliciousness to any celebration. Why do these adorable creations capture our hearts year after year? It’s their undeniable charm, transforming simple cupcakes into edible works of art that are almost too cute to eat. They are the perfect way to get the whole family involved in the kitchen, creating sweet memories alongside sweet treats. What makes these Easter Bunny and Chick Cupcakes truly special isn’t just their playful appearance, but also the comforting, classic flavors they hide witgin extract. Imagine tender vanilla or rich chocolate cake, crowned with fluffy buttercream frosting artfully sculpted into the most endearing bunny ears or cheerful chick faces. They embody the joy of Easter, a gin extractbol of new beginnings and abundant sweetness that everyone, young and old, will adore.”
Ingredients:
- 1 recipe Vanilla Cupcakes (or your favorite cake mix, prepared according to package directions)
- 1 recipe Fluffy Vanilla Frosting (or approximately 4 cups of store-bought vanilla frosting)
- Yellow and white sprinkles
- 1 cup large marshmallows
- 1 cup mini marshmallows
- 1/4 cup pink colored sanding sugar
- 1 tube black decorator icing
- 1/2 cup jelly beans (ensure you have enough pink ones for bunny noses)
- 1/4 cup orange colored gum or M&Ms (for chick beaks)
- Yellow food coloring (liquid or gel)
Preparing Your Cupcakes and Frosting
Baking the Cupcakes
First things first, let’s get our cupcake base ready. If you’re using a cake mix, prepare it according to the package instructions. This usually involves mixing the dry ingredients with wet ingredients like eggs, oil, and water. For a from-scratch vanilla cupcake recipe, ensure you have all your ingredients measured out and ready to go. Divide your batter evenly among your prepared cupcake liners, filling each about two-thirds full to allow for a nice rise. Bake them in a preheated oven according to your recipe or cake mix directions, typically around 350°F (175°C) for 18-25 minutes, or until a toothpick inserted into the center comes out clean. Let the cupcakes cool completely on a wire rack before you even think about frosting them. Warm cupcakes and frosting are a recipe for a messy disaster!
Making the Fluffy Vanilla Frosting
While your cupcakes are cooling, it’s time to tackle the frosting. If you’re making a fluffy vanilla frosting from scratch, follow your chosen recipe carefully. This often involves creaming butter and sugar until light and fluffy, then adding vanilla extract and sometimes milk or cream for the perfect consistency. If you’re using store-bought frosting, you’ll want to give it a good stir to ensure it’s smooth and spreadable. For our Easter Bunny and Chick Cupcakes, we’ll be dividing our frosting and coloring some of it yellow for the chicks. Set aside about half of your frosting for the bunnies. To the remaining half, add a few drops of yellow food coloring at a time, stirring well after each addition until you achieve a cheerful, bright yellow hue. Be patient with the coloring process; it’s better to add a little at a time to avoid an overly intense color.
Decorating the Easter Bunny Cupcakes
Creating the Bunny Ears
Now for the fun part – transforming these simple cupcakes into adorable Easter bunnies! Take one of your cooled vanilla cupcakes and a generous dollop of your plain white vanilla frosting. Spread the frosting evenly over the top of the cupcake, creating a smooth base for our bunny features. For the bunny ears, take two large marshmallows. With a sharp knife, carefully slice each large marshmallow in half lengthwise, creating two slightly curved marshmallow pieces that will serve as your bunny ears. Dip the cut edge of each marshmallow half into the pink colored sanding sugar. Gently press the sugar onto the cut surface so it adheres well. You want a good coating of pink sugar to mimic the inside of a bunny’s ear.
Assembling the Bunny Faces
Once your marshmallow ears are coated in pink sugar, it’s time to attach them to the cupcake. Insert the unsugared end of each pink-sugared marshmallow half into the top of the frosted cupcake, positioning them like bunny ears sticking up. They should stand up nicely. Next, we need to give our bunny a nose. Take one of your pink jelly beans and press it gently into the center of the cupcake, just below where the ears are attached. This will be your sweet little bunny nose. Finally, take your black decorator icing and a fine tip. Carefully draw two small dots above the nose for the bunny’s eyes. You can also add a small upside-down “Y” shape below the nose for a little mouth if you like.
Decorating the Easter Chick Cupcakes
Creating the Chick Frosting Base
Let’s move on to our cheerful little chicks! Take another cooled vanilla cupcake and your yellow-tinted vanilla frosting. Spread a generous amount of the yellow frosting over the top of this cupcake. You want a good mound of frosting that will act as the body of your chick. You can use an offset spatula to create a slightly rounded shape. For a fluffier, more textured look, you can also use a piping bag fitted with a star tip to pipe small swirls all over the cupcake, creating a fluffy chick effect.
Adding the Chick Features
Now it’s time to give our little chicks their distinctive beaks and eyes. For the beak, take one of your orange gum pieces or M&Ms. You might need to trim an orange M&M slightly to make it a more beak-like shape, or use a small piece of orange licorice if you have it. Gently press the orange beak into the front of the yellow frosting, right in the center. For the eyes, use your black decorator icing. Draw two small dots above the beak. You can also use two mini marshmallows cut in half and dotted with black decorator icing for larger, more prominent eyes if you prefer. For an extra touch of cuteness, you can also sprinkle some yellow and white sprinkles over the top of the chick cupcakes before the frosting sets, giving them a slightly speckled, fluffy appearance.
Conclusion:
And there you have it – your very own batch of adorable Easter Bunny and Chick Cupcakes, ready to bring smiles and festive cheer to your table! This recipe is truly a delight to make, transforming simple cupcakes into edible works of art that perfectly capture the spirit of Easter. The joy of creating these festive treats is almost as rewarding as seeing the delighted reactions from your loved ones.
To elevate your Easter spread, I love serving these Easter Bunny and Chick Cupcakes alongside fresh fruit salad, alongside a pot of hot chocolate, or even as a sweet ending to your Easter brunch. They are wonderfully versatile and truly a crowd-pleaser for all ages.
Feel free to get creative with variations! You could experiment with different frosting colors, add sprinkles for extra sparkle, or even use chocolate chips for the bunny’s eyes. For a different flavor profile, consider adding a hint of lemon zest to the cupcake batter or using a cream cheese frosting for a richer taste.
Don’t be intimidated by the decorating – the beauty of these cupcakes is their playful nature. Embrace any imperfections as part of their charm! I encourage you to gather your family and friends and make these Easter Bunny and Chick Cupcakes a memorable part of your Easter celebration. Happy baking!
Frequently Asked Questions:
Can I make the cupcakes ahead of time?
Absolutely! You can bake the cupcake bases up to two days in advance and store them in an airtight container at room temperature. Frost and decorate them on the day of your event for the freshest look.
What if I don’t have piping bags and tips?
No problem at all! You can still achieve a lovely finish by using a zip-top bag with a corner snipped off for frosting. For the bunny ears and chick beaks, you can also use small spatulas or even the back of a spoon to carefully place and shape the fondant or frosting.
Easter Bunny Chick Cupcakes
Fun and festive Easter cupcakes decorated to look like adorable bunnies and cheerful chicks.
Ingredients
-
1 recipe Vanilla Cupcakes (or your favorite cake mix, prepared according to package directions)
-
1 recipe Fluffy Vanilla Frosting (or approximately 4 cups of store-bought vanilla frosting)
-
Yellow and white sprinkles
-
1 cup large marshmallows
-
1 cup mini marshmallows
-
1/4 cup pink colored sanding sugar
-
1 tube black decorator icing
-
1/2 cup jelly beans (ensure you have enough pink ones for bunny noses)
-
1/4 cup orange colored gum or M&Ms (for chick beaks)
-
Yellow food coloring (liquid or gel)
Instructions
-
Step 1
Bake vanilla cupcakes according to your favorite recipe or cake mix directions. Allow them to cool completely on a wire rack. -
Step 2
Prepare fluffy vanilla frosting. Divide the frosting into two portions. Leave one portion white for the bunnies. Tint the other portion yellow with yellow food coloring for the chicks. -
Step 3
For bunny ears, slice large marshmallows in half lengthwise. Dip the cut edge into pink sanding sugar. Insert the unsugared end into the top of a frosted cupcake. Add a pink jelly bean for the nose and draw eyes with black decorator icing. -
Step 4
For chick cupcakes, frost the top of a cupcake with yellow frosting. Press an orange gum or M&M into the frosting for the beak and draw eyes with black decorator icing. -
Step 5
Add optional embellishments such as yellow and white sprinkles to the chick cupcakes for a speckled effect, or pipe frosting details for texture.
Important Information
Nutrition Facts (Per Serving)
It is important to consider this information as approximate and not to use it as definitive health advice.
Allergy Information
Please check ingredients for potential allergens and consult a health professional if in doubt.