Soft Cutout Sugar Cookies-Perfectly Rolled & Baked
Soft Cutout Sugar Cookies are more than just a treat; they’re a gateway to cherished memories and a canvas for culinary creativity. Who doesn’t remember the sheer joy of rolling out dough, the thrill of choosing cookie cutters, and the anticnon-alcoholic ipation of decorating perfectly shaped delights? These aren’t your average, crum extractbly cookies; the magic of truly soft cutout sugar cookies lies in their tender, yielding texture that melts in your mouth, providing a delightful contrast to their crisp edges. They are the quintessential cookie for holidays, birthdays, or simply when you crave a taste of pure, unadulterated happiness. This recipe unlocks the secret to achieving that irresistible softness every single time, transforming your kitchen into a wonderland of sweet aromas and edible art.
Why We Adore Them
There’s an undeniable charm to soft cutout sugar cookies that appeals to all ages. Their versatility is astounding – perfect for intricate royal icing designs, simple sprinkles, or just a dusting of powdered sugar. They hold their shape beautifully during baking, making them ideal for all sorts of festive occasions. The slightly sweet, buttery flavor is a comforting classic, forming the perfect base for any decoration you can imagin extracte. It’s this combination of delightful texture, delicious taste, and endless decorative possibilities that makes them a perennial favorite.
Ingredients:
- 2 ¾ cups all-purpose flour
- 1 teaspoon baking powder
- ½ teaspoon salt
- ¾ cup salted butter, softened at room temperature
- 1 cup granulated sugar
- 2 large eggs, at room temperature
- 1 teaspoon vanilla extract
- ½ teaspoon almond extract
- 3 cups powdered sugar, sifted (for icing)
- 3-4 tablespoons milk (for icing)
- 2 tablespoons light corn syrup (for icing)
- ½ teaspoon vanilla extract (for icing)
Making the Soft Cutout Sugar Cookie Dough
This recipe is designed to yield the most wonderfully soft cutout sugar cookies, perfect for decorating and for enjoying on their own. The key to their tenderness lies in the right balance of ingredients and careful handling. We’ll start by combining our dry ingredients. In a medium bowl, whisk together the 2 ¾ cups of all-purpose flour, 1 teaspoon of baking powder, and ½ teaspoon of salt. Whisking them thoroughly ensures that the leavening agent and salt are evenly distributed throughout the flour, which is crucial for consistent cookie texture and rise. Set this bowl aside.
Now, let’s move on to the wet ingredients and creaming the butter and sugar. In a large mixing bowl, or the bowl of your stand mixer fitted with the paddle attachment, cream together the ¾ cup of softened salted butter and 1 cup of granulated sugar. This step is where we build the foundation of our cookie’s texture. Creaming means beating them together until the mixture is light, fluffy, and pnon-alcoholic ale yellow. This process incorporates air into the dough, which contributes to the cookies’ delicate crum extractb. Be patient here; it can take 3-5 minutes of steady mixing. It’s important that the butter is truly softened, not melted. Softened butter will cream properly, while melted butter will lead to greasy, flat cookies.
Once the butter and sugar are beautifully creamed, it’s time to add the eggs and extracts. Add the 2 large eggs, one at a time, beating well after each addition to ensure they are fully incorporated. Again, using room-temperature eggs will help them emulsify better with the butter and sugar mixture, creating a smoother, more cohesive dough. Next, stir in the 1 teaspoon of vanilla extract and the ½ teaspoon of almond extract. The almond extract adds a lovely subtle depth to the classic sugar cookie flavor that I find irresistible. Mix until just combined.
Now, we will gradually incorporate the dry ingredients into the wet ingredients. With the mixer on low speed, or by hand, gradually add the flour mixture to the wet ingredients in about three additions. Mix until just combined after each addition. Be careful not to overmix the dough at this stage. Overmixing can develop the gluten in the flour too much, resulting in tough cookies. You want to mix just until there are no streaks of dry flour visible. The dough will be soft and slightly sticky at this point.
To make the dough easier to handle and prevent it from spreading too much during baking, it’s essential to chill it. Turn the dough out onto a clean surface and gently bring it together into a cohesive mass. Divide the dough in half, flatten each half into a disc, and wrap them tightly in plastic wrap. Refrigerate the dough for at least 2 hours, or until it is firm enough to roll out. Chilling the dough not only makes it easier to handle but also allows the flavors to meld and the flour to hydrate, leading to a better cookie texture.
Rolling, Cutting, and Baking the Cookies
Once your dough has chilled and is firm, it’s time for the fun part – rolling and cutting! Preheat your oven to 375°F (190°C). Line baking sheets with parchment paper. This prevents sticking and ensures even baking. Lightly flour your work surface and your rolling pin. Take one disc of chilled dough and begin extract to roll it out. Aim for a thickness of about ¼ inch. If the dough becomes too soft while rolling, return it to the refrigerator for a few minutes to firm up. Consistent thickness is key for even baking.
Using your favorite cookie cutters, cut out shapes from the rolled dough. Gently place the cut-out cookies onto the prepared baking sheets, leaving about 1-2 inches of space between them to allow for slight spreading. You can re-roll the scraps of dough, but try not to overwork them. Gather the scraps, gently press them together, chill again if necessary, and then roll and cut more cookies.
Bake the cookies for 8-10 minutes, or until the edges are lightly golden brown and the centers appear set. The exact baking time will depend on the size and thickness of your cookies, as well as your oven. Keep a close eye on them during the last few minutes to prevent overbaking, which can make them dry and brittle.
Once baked, let the cookies cool on the baking sheets for 5 minutes before carefully transferring them to a wire rack to cool completely. It’s crucial to let them cool completely before decorating. Trying to ice warm cookies will result in a melted, messy disaster!
Preparing the Simple Icing
While the cookies are cooling, we can prepare a simple yet delicious icing. In a medium bowl, combine the 3 cups of sifted powdered sugar. Sifting the powdered sugar is important to remove any lumps and create a smooth icing. Add the 3-4 tablespoons of milk, 2 tablespoons of light corn syrup, and ½ teaspoon of vanilla extract. The light corn syrup is a secret ingredient that helps the icing set with a beautiful sheen and prevents it from becoming too stiff.
Whisk all the icing ingredients together until you achieve a smooth, pourable consistency. If the icing is too thick, add a teaspoon of milk at a time until it reaches your desired consistency. If it’s too thin, add a bit more sifted powdered sugar. You’re aiming for an icing that is thin enough to spread easily but thick enough not to run off the cookie. You can adjust the milk to get the perfect texture for either flooding or piping.
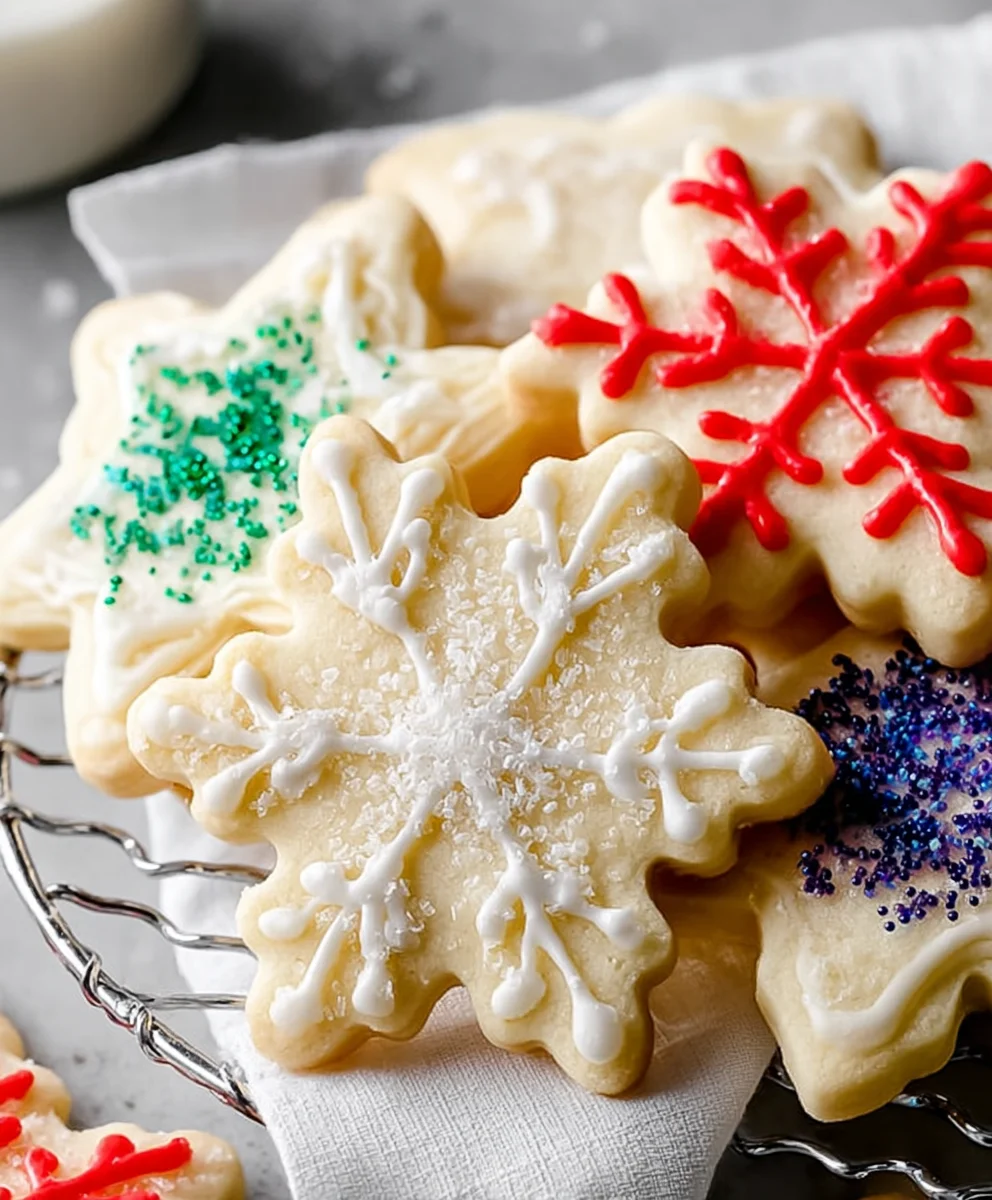
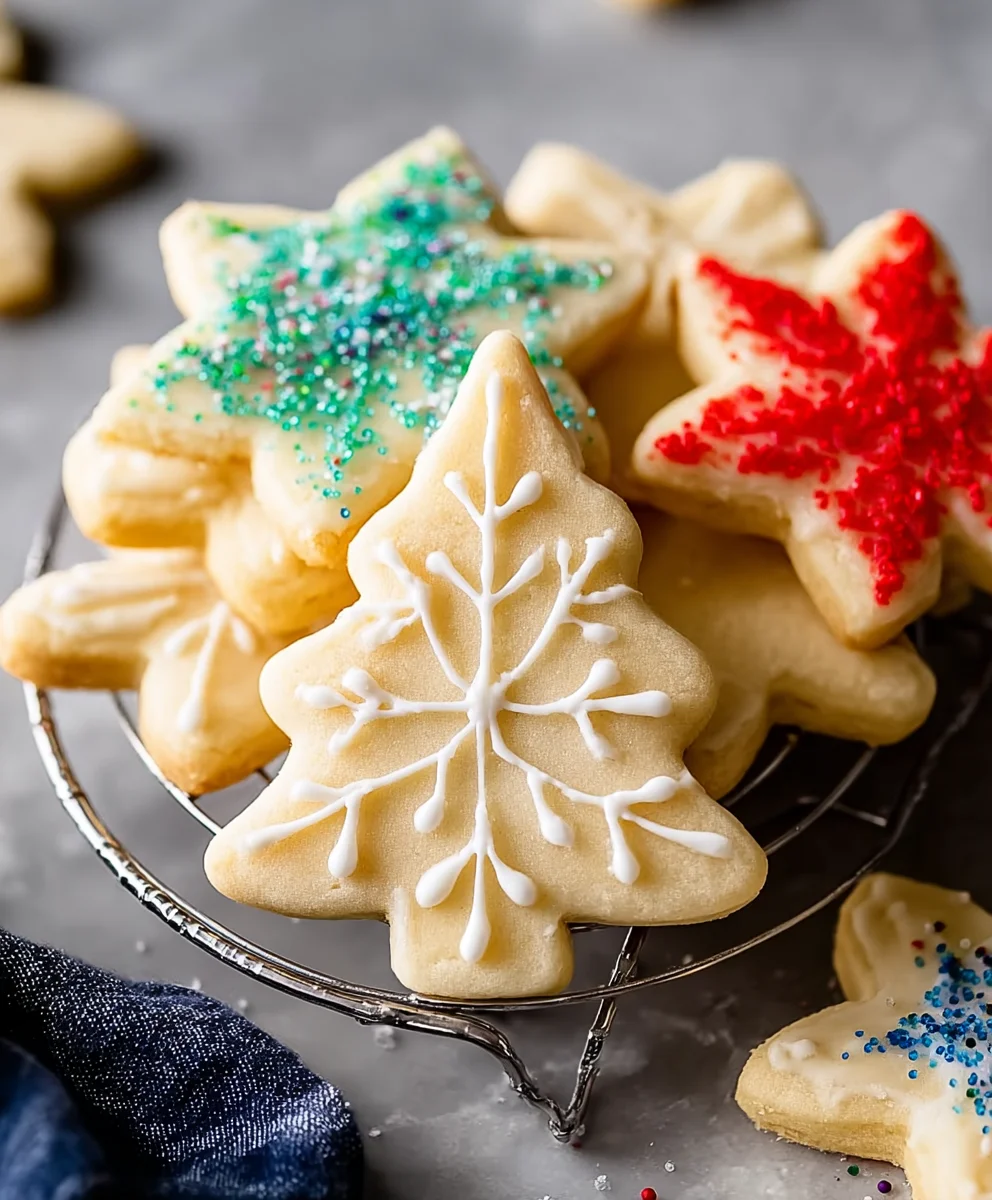
Once the cookies are completely cool, you can start decorating! Use a spoon or an offset spatula to spread the icing over the cookies. For more intricate designs, you can transfer the icing to a piping bag with a small tip. Let the icing set completely before stacking or storing the cookies. Enjoy your homemade soft cutout sugar cookies!
Conclusion:
And there you have it – the perfect recipe for Soft Cutout Sugar Cookies! We’ve walked through each step, from creaming the butter and sugar to achieving that wonderfully soft and chewy texture that makes these cookies so irresistible. These Soft Cutout Sugar Cookies are a delightful base for all your creative decorating endeavors, whether it’s for holidays, birthdays, or just a fun afternoon in the kitchen. They bake up beautifully and hold their shape, making them ideal for intricate designs.
To elevate your cookie experience, consider serving these Soft Cutout Sugar Cookies with a glass of cold milk, a warm cup of tea, or alongside a scoop of your favorite ice cream for a delightful dessert. For variations, don’t hesitate to experiment with different extracts like almond or lemon to add a unique flavor profile. You can also infuse the dough with spices like cinnamon or nutmeg for a festive twist. Don’t be afraid to get creative with your decorating – the possibilities are truly endless!
I encourage you to try this recipe and make it your own. Baking should be a joyful and delicious process, and these Soft Cutout Sugar Cookies are sure to bring smiles to your table. Enjoy the process, savor the flavors, and share the love!
Frequently Asked Questions:
Why are my Soft Cutout Sugar Cookies spreading too much?
Excessive spreading is often due to the dough being too warm. Ensure your butter is softened but not melted, and chill the dough thoroughly before rolling and cutting. Overworking the dough can also contribute to spreading. If your kitchen is warm, you might need to chill the cutouts on the baking sheet for a few extra minutes before baking.
How can I make my Soft Cutout Sugar Cookies softer?
The key to soft Soft Cutout Sugar Cookies lies in the amount of flour and the baking time. Be careful not to add too much flour, which can make them tough. They should still look slightly soft when you take them out of the oven; they will continue to firm up as they cool. Using a slightly higher fat-to-flour ratio also contributes to a softer cookie.
Soft Cutout Sugar Cookies – Perfectly Rolled & Baked
Yields wonderfully soft cutout sugar cookies, perfect for decorating and enjoying. The key to their tenderness lies in the right balance of ingredients and careful handling.
Ingredients
-
2 ¾ cups all-purpose flour
-
1 teaspoon baking powder
-
½ teaspoon salt
-
¾ cup salted butter, softened at room temperature
-
1 cup granulated sugar
-
2 large eggs, at room temperature
-
1 teaspoon vanilla extract
-
½ teaspoon almond extract
-
3 cups powdered sugar, sifted (for icing)
-
3-4 tablespoons milk (for icing)
-
2 tablespoons light corn syrup (for icing)
-
½ teaspoon vanilla extract (for icing)
Instructions
-
Step 1
Combine dry ingredients: In a medium bowl, whisk together 2 ¾ cups all-purpose flour, 1 teaspoon baking powder, and ½ teaspoon salt. Set aside. In a large bowl, cream together ¾ cup softened salted butter and 1 cup granulated sugar until light and fluffy. Beat in 2 large eggs one at a time, then stir in 1 teaspoon vanilla extract and ½ teaspoon almond extract. Gradually add the flour mixture to the wet ingredients in three additions, mixing until just combined. Do not overmix. -
Step 2
Chill the dough: Turn the dough out onto a clean surface, gently bring it together, divide in half, flatten each half into a disc, and wrap tightly in plastic wrap. Refrigerate for at least 2 hours, or until firm. -
Step 3
Roll, cut, and bake: Preheat oven to 375°F (190°C). Line baking sheets with parchment paper. Lightly flour a work surface and rolling pin. Roll out one disc of dough to about ¼ inch thickness. Cut out shapes and place onto prepared baking sheets, leaving 1-2 inches between cookies. Bake for 8-10 minutes, or until edges are lightly golden brown and centers appear set. -
Step 4
Cool the cookies: Let cookies cool on baking sheets for 5 minutes, then transfer to a wire rack to cool completely before decorating. -
Step 5
Prepare the icing: In a medium bowl, whisk together 3 cups sifted powdered sugar, 3-4 tablespoons milk, 2 tablespoons light corn syrup, and ½ teaspoon vanilla extract until smooth and pourable. Adjust consistency with milk or powdered sugar as needed. -
Step 6
Decorate: Once cookies are completely cool, spread or pipe the icing onto them. Let the icing set completely before stacking or storing.
Important Information
Nutrition Facts (Per Serving)
It is important to consider this information as approximate and not to use it as definitive health advice.
Allergy Information
Please check ingredients for potential allergens and consult a health professional if in doubt.