Perfect Ramen Eggs Ajitama – Easy Flavorful Recipe
Ramen eggs, or ajitama, are more than just a topping; they are a culinary revelation that elevates any bowl of ramen from delicious to downright divine. I’m not sure about you, but for me, the moment I spot those perfectly marinated, jammy-yolked treasures nestled amongst the noodles, my heart sings. What is it about these humble, soy-marinated eggs that captures our taste buds and imagin extractations? It’s the exquisite balance – the tender, yielding whites infused with a savory, slightly sweet umami bomb, and the impossibly creamy, luscious yolk that spills its golden richness into the broth. This isn’t just about adding protein; it’s about infusing every single bite with concentrated flavor. Prepare yourself, because once you master these perfect ramen eggs, you’ll find yourself craving them in everything from soups to salads.
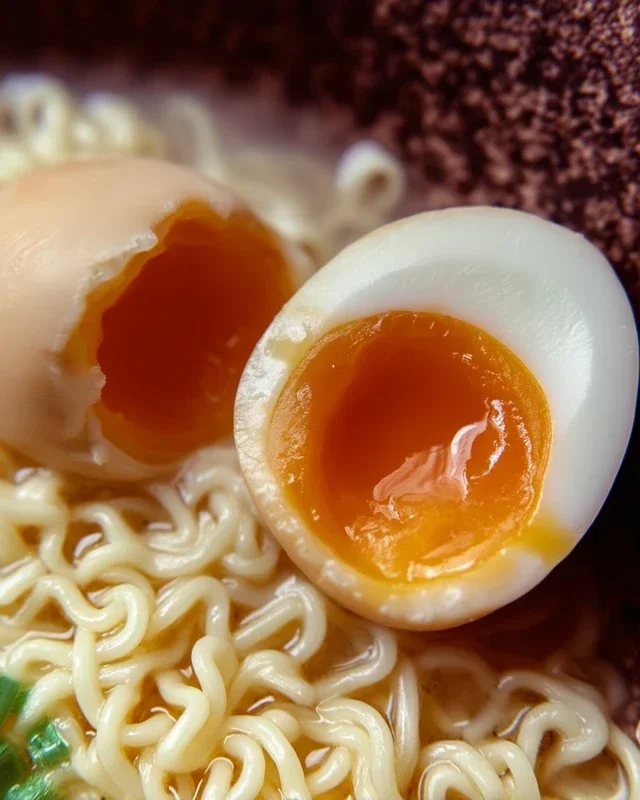
Ramen Eggs (Ajitama)
There’s something incredibly satisfying about a perfectly prepared ramen egg, or ajitama, nestled atop a steaming bowl of noodles. That creamy, custardy yolk, infused with a savory and slightly sweet marinade, is the crowning glory of any ramen dish. While they might seem a little intimidating to make at home, I promise you, they are surprisingly straightforward and absolutely worth the effort. This recipe will guide you through creating those restaurant-quality ramen eggs that will elevate your homemade ramen to a whole new level. Let’s get started!
Ingredients:
The Marinade Mixture
The magic of ajitama lies in its marinade. This simple concoction of soy sauce, water, non-alcoholic mirin, and sugar is what transforms a regular boiled egg into a flavor bomb. The soy sauce provides the salty, umami depth, the water helps to dilute it slightly so it’s not too overpowering, the non-alcoholic mirin brings a subtle sweetness and glossiness, and the sugar further enhances that delightful sweetness and aids in achieving a beautiful glaze. I opt for light sodium soy sauce to control the saltiness better, but feel free to use your favorite.
Preparing the Eggs: The Foundation
The first step is to get your eggs perfectly boiled. This is crucial for achieving that ideal ramen egg texture – a firm but tender white with a gloriously jammy, gooey yolk.
Boiling the Eggs
1. Gentle Boil: Bring a medium saucepan of water to a gentle boil. You can add a splash of vinegar to the water, which some believe helps to prevent the whites from escaping if an egg cracks, though it’s not strictly necessary. Carefully lower the 6 eggs into the boiling water. I like to use a slotted spoon or a spider strainer to ensure they don’t crack when hitting the water.
2. Precise Timing: This is where the magic happens. For that perfect jammy yolk, you’ll want to boil the eggs for exactly 6 to 7 minutes. If you prefer a firmer yolk, you can extend this time to 8 minutes. Start your timer immediately after adding the eggs. The exact timing can vary slightly depending on the size of your eggs and your stove’s heat, so don’t be afraid to experiment once you’ve made them a few times to find your sweet spot.
3. Instant Ice Bath: As soon as your timer goes off, immediately remove the eggs from the hot water using your slotted spoon and plunge them into an ice bath. This is a critical step to stop the cooking process instantly. The shock of the cold water prevents the yolks from overcooking and solidifying. Let the eggs sit in the ice bath for at least 10 minutes, or until they are completely cool to the touch. This also makes them easier to peel.
Peeling the Eggs
Once the eggs are thoroughly chilled, it’s time to peel them. I find that gently tapping the egg all over on a hard surface and then rolling it between my hands helps to loosen the shell. Starting from the wider end, where the air pocket usually is, try to peel the shell off in large pieces. If you’re having trouble, you can try peeling them under a gentle stream of cool running water, which can help wash away stubborn bits of shell. Be gentle; we don’t want to damage those beautiful yolks!
Marinating the Ajitama
Now for the fun part – infusing those perfectly boiled and peeled eggs with incredible flavor!
1. Whisk the Marinade: In a medium bowl or a large zip-top bag, combine the soy sauce, water, non-non-non-alcoholic alternativeic non-alcoholic mirin, and granulated sugar. Whisk or shake well until the sugar is completely dissolved. Ensure all the ingredients are well-incorporated. If using a zip-top bag, ensure it’s senon-alcoholic aled tightly to prevent any leaks.
2. Submerge and Marinate: Gently place the peeled, hard-boiled eggs into the marinade. Make sure they are fully submerged. If you’re using a bowl, you might need to place a small plate or a piece of parchment paper on top of the eggs to keep them submerged. If using a zip-top bag, you can simply press out any excess air and seal it.
3. Chill and Infuse: Now comes the waiting game. Cover the bowl or seal the zip-top bag and refrigerate the eggs for at least 4 hours, but ideally for 8 to 24 hours. The longer they marinate, the deeper the flavor and the more beautiful the color will be. I like to flip them occasionally during the marinating process to ensure even coloring and flavor distribution. You’ll notice the whites start to take on a lovely amber hue as they absorb the marinade.
Serving Your Ajitama
Once your ramen eggs have had ample time to soak up all that deliciousness, they are ready to be enjoyed! Carefully remove them from the marinade. You can serve them whole, or for that classic ramen look, slice them in half lengthwise with a sharp knife. The vibrant, jammy yolk will be revenon-alcoholic aled, ready to make your ramen sing. These ajitama are not just for ramen; they are also fantastic in bento boxes, on top of rice bowls, or even as a sophisticated snack. Enjoy the fruits of your labor – your homemade ramen eggs are sure to be a hit!

Conclusion:
And there you have it! Making perfect Ramen Eggs, or Ajitama, is surprisingly simple and incredibly rewarding. These marinated soft-boiled eggs are more than just a topping; they’re a flavor explosion waiting to happen. The creamy, custardy yolk, infused with the savory, umami-rich marinade, elevates any dish you add them to. I truly believe this recipe is a game-changer for any home cook looking to add a touch of gourmet to their meals without much effort.
The beauty of Ajitama lies in their versatility. While they are, of course, the quintessential ramen topping, don’t stop there! Slice them in half and serve them on avocado toast, add them to rice bowls, top a salad, or even enjoy them as a flavorful snack. Experiment with different marinades too – a touch of chili oil for heat, some non-alcoholic mirin for extra sweetness, or even a splash of non-alcoholic sake for a deeper flavor profile. I encourage you all to give this Ramen Eggs recipe a try. I’m confident you’ll be hooked!
Frequently Asked Questions about Ramen Eggs:
How long do Ramen Eggs last in the refrigerator?
Once prepared and stored in their marinade, Ramen Eggs will typically last for 3-4 days in the refrigerator. It’s best to keep them submerged in the marinade to maintain their flavor and texture.
Can I make the marinade ahead of time?
Absolutely! The marinade can be made up to a week in advance and stored in an airtight container in the refrigerator. This makes assembling your Ajitama even quicker when you’re ready to marinate your eggs.
What’s the best way to peel the soft-boiled eggs without breaking them?
The trick to easy peeling is to use slightly older eggs (not super fresh) and to shock them immediately in an ice bath after boiling. Gently crack the shell all over, then peel them under cool running water. This helps to separate the membrane from the egg white, making peeling much smoother.
Ramen Eggs (Ajitama)
Perfectly marinated soft-boiled eggs for ramen, with a savory and slightly sweet glaze.
Ingredients
-
6 large eggs
-
1/2 cup soy sauce (light sodium)
-
1/4 cup water
-
1/4 cup non-alcoholic mirin
-
2 tablespoons granulated sugar
-
1 tablespoon rice vinegar
Instructions
-
Step 1
Gently place eggs in a pot and cover with cold water. Add rice vinegar if using. Bring to a rolling boil over medium-high heat. -
Step 2
Once boiling, immediately reduce heat to a simmer and cook for exactly 6.5 to 7 minutes for a jammy yolk. -
Step 3
Prepare an ice bath. Once cooked, immediately transfer eggs to the ice bath to stop the cooking process. -
Step 4
In a small saucepan, combine soy sauce, water, non-alcoholic mirin, and granulated sugar. Heat gently, stirring until sugar is dissolved. Let cool. -
Step 5
Once eggs are completely cool, gently peel them. -
Step 6
Place the peeled eggs in a resealable bag or container and pour the cooled marinade over them. Ensure eggs are fully submerged. -
Step 7
Marinate in the refrigerator for at least 12 hours, or up to 3 days, flipping occasionally for even coloring.
Important Information
Nutrition Facts (Per Serving)
It is important to consider this information as approximate and not to use it as definitive health advice.
Allergy Information
Please check ingredients for potential allergens and consult a health professional if in doubt.