Easy No-Bake Banoffee Cheesecake Recipe-Decadent Treat
No-Bake Banoffee Cheesecake dreams are made of this! If you’re anything like me, the mere mention of banoffee pie evokes images of sweet, sticky caramel, ripe bananas, and a buttery biscuit base. Now, imagin extracte all that glorious flavor swirled into a luxuriously creamy cheesecake, with absolutely zero oven time required. That’s the magic of this no-bake banoffee cheesecake. It’s the ultimate crowd-pleaser, perfect for birthdays, dinner parties, or simply when you need a serious dessert upgrade. What truly sets this dessert apart is its effortless elegance. It looks impressive, tastes divine, and requires surprisingly little effort, making it my go-to for those moments when I want to impress without the stress. The symphony of textures – the crum extractbly base, the velvety smooth filling, and the fresh banana – is simply irresistible. Prepare to fall head over heels for this incredible no-bake banoffee cheesecake!
No-Bake Banoffee Cheesecake
There’s something incredibly satisfying about a dessert that requires no oven time, especially when it delivers on flavour as spectacularly as this no-bake banoffee cheesecake. This recipe combines the classic caramel, banana, and cream elements of banoffee pie with the luxurious, creamy texture of cheesecake. It’s a perfect treat for a special occasion, a weekend indulgence, or simply when you’re craving something utterly delicious and want to avoid turning on the oven. The cashew nuts provide a wonderfully creamy and rich base for the cheesecake filling, making it surprisingly decadent and satisfying, while the biscuit base offers that essential crunch. We’re keeping it simple and fuss-free, proving that you don’t need to be a baking expert to create something truly impressive.
Ingredients:
Instructions:
Prepare the Biscuit Base: First, let’s get our delicious crunchy base ready. Take your plain biscuits and crush them into fine crum extractbs. You can do this by placing them in a zip-top bag and bashing them with a rolling pin, or for a quicker method, pulse them in a food processor until you have a fine, sand-like consistency. In a medium bowl, melt the dairy-free butter or margarine. Add the crushed biscuit crum extractbs to the melted butter and mix thoroughly until all the crum extractbs are evenly coated. This mixture should feel like damp sand. Take a springform tin (about 8-inch diameter is ideal) and press the biscuit mixture firmly and evenly into the base. You can use the back of a spoon or the base of a glass to get it nice and compact. This will form the sturdy foundation for our cheesecake. Once pressed, place the tin in the refrigerator to chill and set while you prepare the filling. This chilling step is crucial for a firm base that won’t crum extractble when you slice the cheesecake.
Create the Creamy Cashew Filling: Now for the luscious cheesecake filling. Drain the pre-soaked cashew nuts thoroughly. Place the drained cashews into a high-powered blender or food processor. Add the dairy-free cream cheese and the coconut cream to the blender. You’ll also need to add the icing sugar at this stage for sweetness. Blend everything together until you achieve a completely smooth and velvety consistency. This might take a few minutes, and you may need to scrape down the sides of the blender a couple of times to ensure all the cashews are fully incorporated and no grainy texture remains. It’s essential to get this filling as smooth as possible for that luxurious cheesecake mouthfeel. The coconut cream adds a lovely richness and helps with the overall creamy texture, while the cashews provide a beautiful, subtle nutty flavour and natural creaminess.
Assemble the Cheesecake Layers: Once your cashew filling is perfectly smooth, it’s time to assemble the cheesecake. Take the chilled biscuit base out of the refrigerator. Pour about half of the creamy cashew filling over the biscuit base and spread it out evenly using a spatula. Now, prepare your banana. Peel the medium-sized banana and slice it thinly. Arrange these banana slices in a single layer over the cream cheese mixture. Drizzle a generous amount of vegan caramel sauce over the banana slices. This is where the banoffee magic really starts to happen! Now, pour the remaining cashew filling over the caramel-covered bananas, ensuring the entire layer is covered. Gently spread the top layer of filling to create a smooth surface. You can give the tin a gentle tap on the counter to help settle the filling and remove any air bubbles.
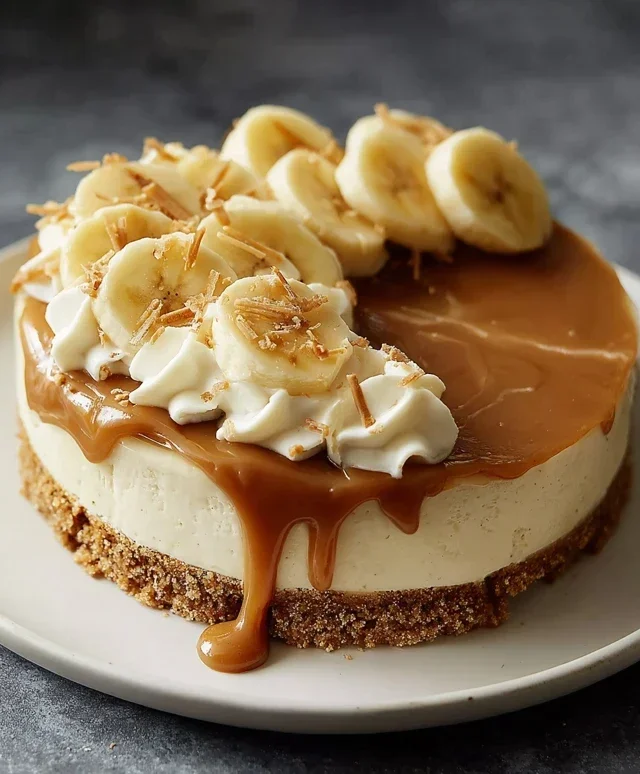
Chill and Decorate: For the cheesecake to set properly, it needs a good amount of chilling time. Cover the springform tin loosely with cling film or foil and place it in the refrigerator for at least 4-6 hours, or ideally, overnight. The longer it chills, the firmer and more sliceable your cheesecake will become. Once the cheesecake has set and is firm to the touch, it’s time for the final flourishes. Carefully release the springform tin by undoing the clasp. You can run a thin knife around the edge before releasing if you’re worried about it sticking. Now for the decoration! Whip the dairy-free whipping cream until soft peaks form. Dollop or pipe the whipped cream around the top edge of the cheesecake. Artfully arrange fresh banana slices on top of the whipped cream and in the centre of the cheesecake. Finally, drizzle generously with more vegan caramel sauce. The contrast of the dark caramel, white cream, and fresh banana is visually stunning and promises a flavour explosion.
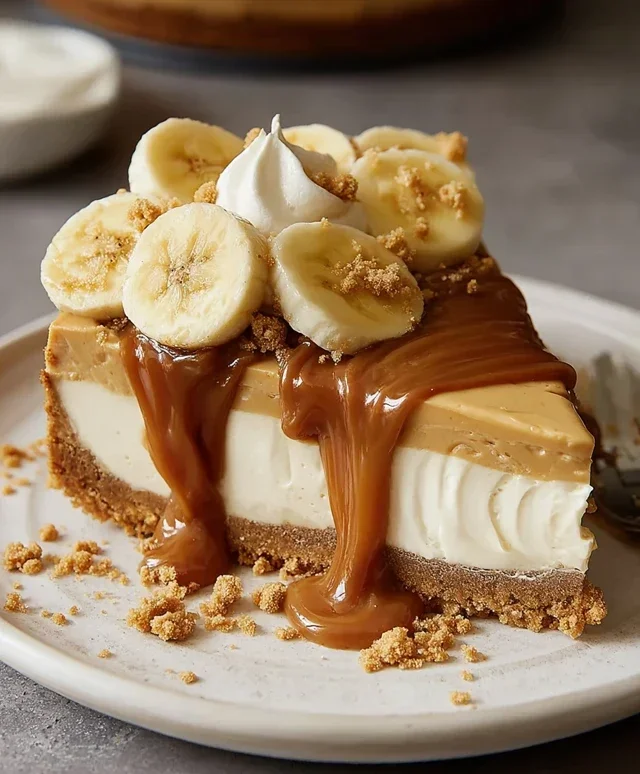
Serve and Enjoy: Your magnificent no-bake banoffee cheesecake is now ready to be admired and, more importantly, devoured! Slice it carefully with a sharp knife, wiping the knife clean between each slice for neat cuts. Serve each slice with a little extra whipped cream and caramel sauce if you like. This cheesecake is best served chilled. The combination of the crunchy biscuit base, the smooth, creamy cashew filling, the sweet caramel, and the fresh banana is simply irresistible. It’s a relatively simple dessert to make, but it tastes like something from a high-end patisserie. The no-bake nature makes it perfect for warmer weather or when you just don’t have the energy (or desire!) to turn on the oven. Enjoy every decadent bite of this delightful treat!
Conclusion:
So there you have it – a ridiculously delicious and surprisingly easy No-Bake Banoffee Cheesecake! This recipe truly is a showstopper, offering all the irresistible flavors of the classic banoffee pie – creamy caramel, ripe bananas, and a crum extractbly biscuit base – without any of the oven fuss. It’s perfect for those hot summer days when you don’t want to turn on the oven, or for anyone who loves a decadent dessert that’s simple to assemble. I love serving this chilled, straight from the fridge, as it firms up beautifully. It’s wonderful on its own, but also pairs wonderfully with a dollop of whipped cream, a sprinkle of chocolate shavings, or even a drizzle of extra caramel sauce.
Don’t be afraid to get creative with variations! You could try adding a touch of coffee liqueur extract to the caramel for a grown-up twist, or mixing some chopped pecans into the biscuit base for added crunch. Perhaps even swirl some chocolate ganache through the cheesecake filling for a banoffee-chocolate fusion. The beauty of this No-Bake Banoffee Cheesecake is its adaptability. I genuinely encourage you to give this recipe a try; I promise you won’t be disappointed by this delightful no-bake treat!
Frequently Asked Questions:
Can I make this cheesecake ahead of time?
Absolutely! This No-Bake Banoffee Cheesecake is actually best made a few hours (or even the day) in advance. This allows the flavors to meld beautifully and the cheesecake to set properly in the refrigerator. Just make sure to cover it tightly to prevent it from absorbing any fridge odors.
What kind of biscuits are best for the base?
Digestive biscuits are the classic choice and work wonderfully for this recipe, providing a lovely crum extractbly texture and subtle sweetness. However, you could also use Grabeef ham crackers or even shortbread biscuits for a slightly different flavor profile. Just ensure they’re crushed finely enough to form a cohesive base when mixed with melted butter.
My caramel sauce seems too runny, what should I do?
If your caramel sauce is a bit too thin after cooking, don’t worry! The cheesecake filling will help to thicken it as it chills. However, if it’s significantly runny, you can try gently simmering it for a few more minutes to allow some of the moisture to evaporate. Alternatively, you can add a very small amount of cornstarch (dissolved in a teaspoon of water) and stir it in while it’s simmering to help it thicken.
No-Bake Banoffee Cheesecake
A delicious and easy no-bake banoffee cheesecake featuring a biscuit base, creamy cashew filling, and layers of banana and caramel.
Ingredients
-
200g plain biscuits (use gluten-free biscuits if required)
-
100g dairy-free butter or margarine
-
140g cashew nuts (pre-soaked in warm water overnight)
-
340g dairy-free cream cheese
-
50g coconut cream
-
80g icing sugar
-
1 medium-sized banana
-
Vegan caramel sauce
-
Fresh banana slices
-
80ml dairy-free whipping cream
-
Vegan caramel sauce
Instructions
-
Step 1
Crush the plain biscuits into fine crumbs. Melt the dairy-free butter or margarine and mix it with the biscuit crumbs until well combined. -
Step 2
Press the biscuit mixture firmly into the base of a springform cake tin to form an even crust. Chill in the refrigerator for at least 15 minutes. -
Step 3
Drain the soaked cashew nuts. Blend the cashew nuts with the dairy-free cream cheese, coconut cream, and icing sugar until completely smooth and creamy. You may need to scrape down the sides of the blender a few times. -
Step 4
Spread half of the cashew cream mixture over the chilled biscuit base. Layer with sliced banana and drizzle generously with vegan caramel sauce. -
Step 5
Top with the remaining cashew cream mixture, smoothing the top. Drizzle more vegan caramel sauce over the top and decorate with fresh banana slices. -
Step 6
Whip the dairy-free whipping cream until soft peaks form. Dollop or pipe the whipped cream around the edge of the cheesecake for decoration. Chill the cheesecake in the refrigerator for at least 4 hours, or preferably overnight, before serving.
Important Information
Nutrition Facts (Per Serving)
It is important to consider this information as approximate and not to use it as definitive health advice.
Allergy Information
Please check ingredients for potential allergens and consult a health professional if in doubt.