Easy Bunny Rabbit Cake Recipe-Fun Dessert
Bunny Rabbit Cake is more than just a dessert; it’s a celebration in edible form, a whimsical creation that instantly brings smiles to faces, especially during spring holidays and birthdays. Who can resist a fluffy, frosted bunny peeking out from a plate? This delightful confection has a special place in many hearts because it evokes a sense of childhood wonder and playful joy. It’s not just about the delicious cake underneath (though we’ll get to that!); it’s about the enchanting presentation. The magic of a Bunny Rabbit Cake lies in its ability to transform a simple baked good into a charming centerpiece, sparking imagin extractation and creating cherished memories. Whether you’re a seasoned baker or a novice looking for a showstopper, this recipe will guide you through creating your own perfect Bunny Rabbit Cake.
Bunny Rabbit Cake
Get ready to hop into some baking fun with this adorable Bunny Rabbit Cake! This recipe is perfect for Easter, spring birthdays, or just to bring a smile to anyone’s face. It’s surprisingly straightforward to make and the result is a showstopper that tastes as good as it looks. We’ll be using a simple vanilla cake recipe as our base, and then shaping and decorating it to resemble a sweet little bunny. Don’t worry if you’re not a cake decorating expert – the charm of this cake lies in its whimsical nature, and even a few simple touches will make it incredibly special. Let’s gather our ingredients and get started on this delightful dessert!
Ingredients:
Preparing the Cake Batter
Our journey begin extracts with creating a moist and flavorful vanilla cake. In a large mixing bowl, we’ll combine our dry ingredients. Whisk together the all-purpose flour, granulated sugar, baking powder, and salt. This ensures that all the leavening agents and seasoning are evenly distributed, leading to a consistent cake texture. Next, in a separate bowl, cream together the softened unsalted butter until it’s light and fluffy. This step is crucial for incorporating air into the batter, which contributes to a tender cake. Gradually add the eggs, one at a time, beating well after each addition until fully incorporated. Stir in the vanilla extract, which will add that classic comforting flavor.
Now, we’ll alternate adding the dry ingredients and the milk to the butter and egg mixture. Start by adding about a third of the dry ingredients to the wet ingredients and mix on low speed until just combined. Then, add half of the milk and mix again. Continue this process, adding another third of the dry ingredients, followed by the remaining milk, and finishing with the last of the dry ingredients. Be careful not to overmix the batter once the flour is added; overmixing can develop the gluten too much, resulting in a tougher cake. Mix only until the streaks of flour disappear. The batter should be smooth and pourable.
Baking and Shaping the Bunny
To create our bunny shape, we’ll need two round cake pans (8 or 9 inches in diameter) and a bowl (like a Pyrex or an oven-safe mixing bowl, about 1.5-2 quarts in size). Lightly grease and flour all the pans you’ll be using. This prevents the cakes from sticking and ensures easy removal after baking. Divide the cake batter evenly between the two round pans. The bowl will be used for the bunny’s head, so fill it about two-thirds full with batter. Smooth the tops of the batter in each pan and the bowl.
Bake the cakes at 350°F (175°C). The round cakes will likely take around 25-30 minutes, and the head in the bowl might take a bit longer, around 30-35 minutes. You can tell they are done when a wooden skewer or toothpick inserted into the center comes out clean. Once baked, let the cakes cool in their pans for about 10-15 minutes before inverting them onto wire racks to cool completely. Patience here is key; trying to frost a warm cake is a recipe for disaster!
Once the cakes are completely cool, it’s time for the magic of shaping. For the bunny’s body, we’ll use one of the round cakes. For the head, we’ll use the cake baked in the bowl. You can trim the domed tops of the round cakes if they are very pronounced, so they sit flat. The bowl-shaped cake will naturally form a rounded head. You can also use the second round cake to cut out ears if you wish. To do this, simply cut a semi-circle from one side of the round cake and then cut that semi-circle in half to create two ear shapes.
Frosting and Decorating Your Bunny
Now for the fun part – bringin extractg our bunny to life with frosting! First, let’s make our delicious vanilla buttercream. In a large bowl, beat the softened butter until creamy. Gradually add the powdered sugar, alternating with the milk, until you achieve a smooth and spreadable consistency. Stir in the vanilla extract. If the frosting is too thick, add a little more milk, a teaspoon at a time. If it’s too thin, add more powdered sugar.
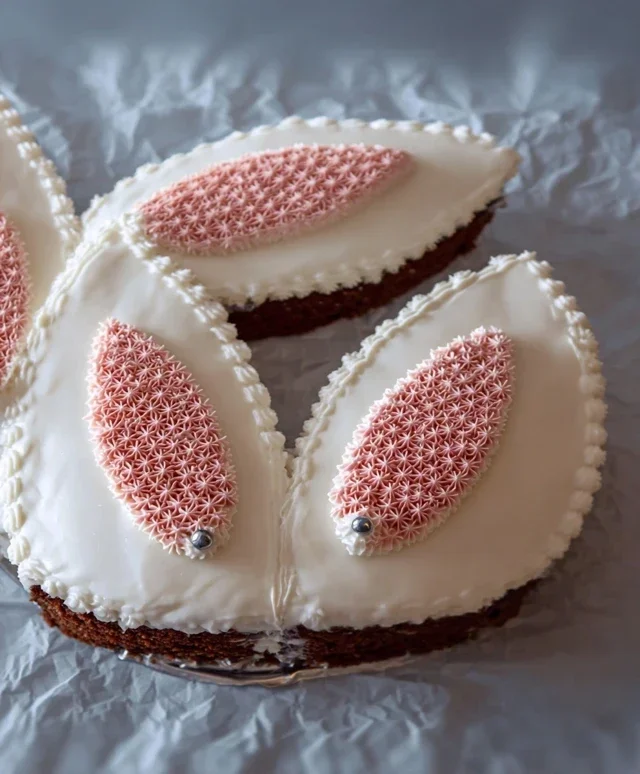
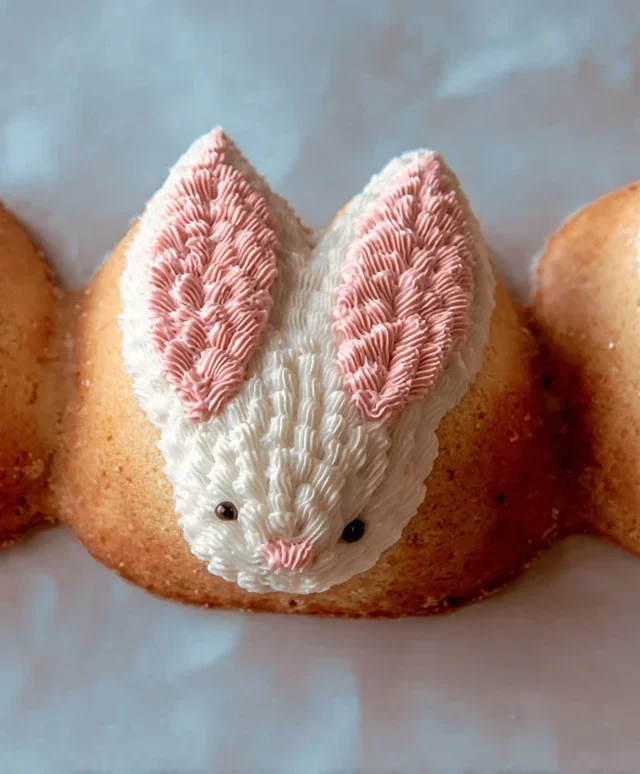
Divide the frosting into two bowls. Leave one bowl plain white for the bunny’s fur. In the other bowl, add a few drops of pink food coloring and mix until you achieve a lovely pastel pink for the bunny’s ears and nose. Now, let’s assemble and frost! Place the round cake (the body) on your serving platter. Top it with a generous amount of white frosting and spread it evenly. Place the bowl-shaped cake (the head) on top of the body. You can secure it with a dab of frosting if needed. Frost the head with white frosting.
Now, it’s time for the details. Take your pink frosting and carefully spread it inside the “ears” that you’ve placed on top of the head. If you cut out ear shapes from the second round cake, you can frost those pink and attach them to the top of the head. Use a bit of pink frosting to create a cute nose in the center of the face. For the eyes, you can use mini chocolate chips or edible googly eyes. For a fluffy fur effect, you can press shredded coconut all over the white frosted areas of the cake. You can also use a piping bag with a star tip to create textured fur if you’re feeling fancy. Don’t be afraid to get creative and add your own personal touches. This cake is all about fun and celebrating! Enjoy every delicious bite of your adorable Bunny Rabbit Cake!
Conclusion:
And there you have it – your very own adorable Bunny Rabbit Cake! This recipe is truly a winner because it’s not only visually stunning, making it the perfect centerpiece for Easter, spring birthdays, or any occasion needing a touch of whimsy, but it’s also wonderfully delicious. The moist cake and creamy frosting are a delightful combination that everyone, from kids to adults, will adore. I truly hope you’ll give this recipe a try; you’ll be amazed at how impressive yet achievable it is!
For serving, this bunny cake is fantastic on its own. However, consider pairing it with a light fruit salad for a fresh contrast, or a scoop of vanilla ice cream for an extra decadent treat. When it comes to variations, feel free to get creative! You can use different cake flavors like chocolate or lemon. Decorate with colorful sprinkles, edible flowers, or even small candies for added flair. The possibilities for personalizing your bunny are endless, allowing you to make it uniquely yours.
Frequently Asked Questions about the Bunny Rabbit Cake:
How far in advance can I bake and decorate the Bunny Rabbit Cake?
You can bake the cake layers up to two days in advance and store them, well-wrapped, at room temperature. For the frosting, it’s best to prepare it on the day you plan to assemble and decorate your bunny cake to ensure the best texture and flavor. However, once decorated, the cake can be stored in an airtight container at room temperature for up to 2-3 days, though it’s most delightful when enjoyed fresh!
What if I don’t have a specific piping tip for the fur texture?
No worries at all! You can achieve a lovely fur effect without a specialized piping tip. Simply use a star tip (like a medium or large one), or even the plain round tip of your piping bag and make small, overlapping dots or short strokes. Alternatively, you can use a fork to gently create a textured pattern in the frosting. The goal is to create a fluffy, rabbit-like appearance, and improvisation often leads to wonderful results!
Bunny Rabbit Cake
A charming and delicious cake shaped like a bunny rabbit, perfect for Easter or any celebration. This recipe yields a moist and flavorful cake that’s a delight to decorate and eat.
Ingredients
-
2 ½ cups all-purpose flour
-
1 ½ teaspoons baking powder
-
½ teaspoon salt
-
1 cup unsalted butter, softened
-
1 ¾ cups granulated sugar
-
3 large eggs
-
1 teaspoon vanilla extract
-
1 ¼ cups milk
-
Buttercream frosting (store-bought or homemade)
-
Confectioners’ sugar (for dusting)
Instructions
-
Step 1
Preheat oven to 350°F (175°C). Grease and flour two 8-inch round cake pans. -
Step 2
In a medium bowl, whisk together flour, baking powder, and salt. Set aside. -
Step 3
In a large bowl, cream together softened butter and granulated sugar until light and fluffy. -
Step 4
Beat in eggs one at a time, then stir in vanilla extract. -
Step 5
Alternately add the dry ingredients and milk to the butter mixture, beginning and ending with the dry ingredients. Mix until just combined. Do not overmix. -
Step 6
Pour batter evenly into the prepared pans. Bake for 30-35 minutes, or until a wooden skewer inserted into the center comes out clean. -
Step 7
Let cakes cool in the pans for 10 minutes before inverting them onto a wire rack to cool completely. -
Step 8
Once cooled, use a sharp knife to cut and shape the cakes into a bunny rabbit form (e.g., one round for the body, another cut in half for ears, and a smaller piece for the tail). Assemble on a serving platter. -
Step 9
Frost the entire cake with buttercream frosting. Decorate with additional frosting, candies, or edible decorations as desired to create facial features and details. -
Step 10
Dust lightly with confectioners’ sugar before serving.
Important Information
Nutrition Facts (Per Serving)
It is important to consider this information as approximate and not to use it as definitive health advice.
Allergy Information
Please check ingredients for potential allergens and consult a health professional if in doubt.