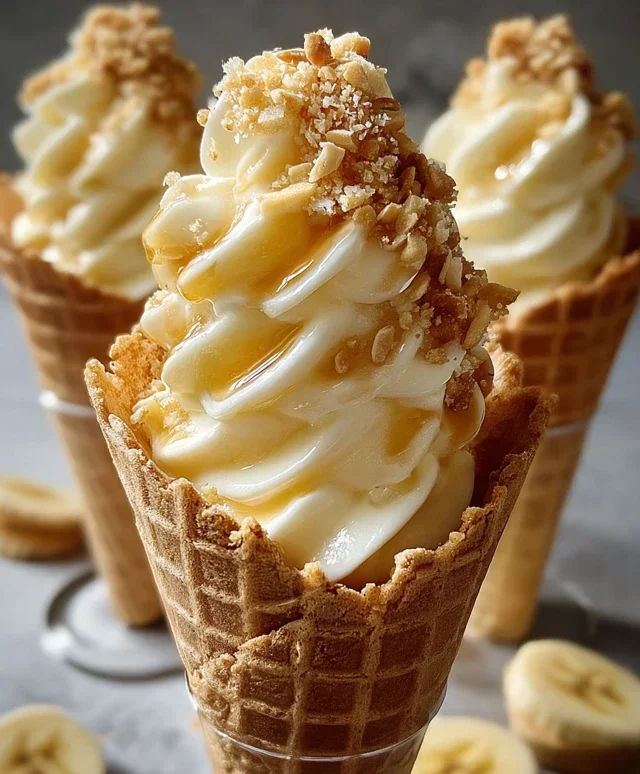
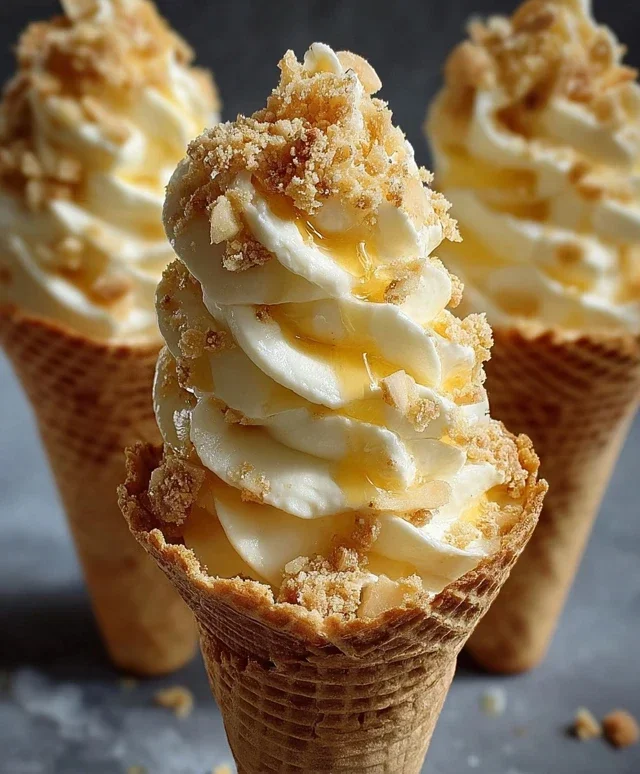
Banana Pudding Cheesecake Cones-Creamy Dreamy Dessert
Banana Pudding Cheesecake Cones are about to become your new obsession. We’ve taken two beloved desserts and swirled them into an utterly delightful, handheld treat that’s guaranteed to steal the show at any gathering, or just make your Tuesday feel like a celebration. Imagin extracte the creamy, dreamy goodness of classic banana pudding – those tender banana slices, the luscious vanilla custard, and the crunchy wafers – all united with the rich, decadent tang of cheesecake. That’s exactly what we’ve captured in these magical Banana Pudding Cheesecake Cones! This isn’t just a dessert; it’s a nostalgic hug in edible form, elevated with a playful twist that’s both familiar and exciting. Forget the spoon; it’s time to grab a cone and dive into this sensational fusion. Get ready to experience pure bliss with every single bite of these incredible Banana Pudding Cheesecake Cones.
Banana Pudding Cheesecake Cones
Get ready for a dessert mashup that’s sure to delight! We’re combining the creamy, dreamy goodness of banana pudding with the rich indulgence of cheesecake, all nestled inside a crispy waffle cone. These Banana Pudding Cheesecake Cones are a playful and delicious way to enjoy your favorite flavors in a fun, handheld format. Perfect for parties, a special treat, or just because, these cones are surprisingly easy to make and guaranteed to impress. Let’s dive in!
Ingredients:
Cheesecake Filling
The base of our delightful cones is a light and airy cheesecake filling. It’s the perfect canvas for the banana pudding flavor.
Step 1: Crafting the Creamy Cheesecake Base
First, in a medium-sized mixing bowl, we’ll begin extract by creaming together our softened cream cheese and powdered sugar. Make sure your cream cheese is truly at room temperature; this is crucial for achieving a smooth, lump-free filling. You can use an electric mixer on medium speed or a sturdy whisk for this. Beat them together until the mixture is completely smooth and fluffy, with no visible streaks of powdered sugar. This process aerates the mixture, contributing to a lighter texture. Once that’s looking perfect, we’ll gently fold in the ½ teaspoon of vanilla extract. The vanilla adds a beautiful depth of flavor that complements both the cheesecake and the banana beautifully. Don’t overmix at this stage; we just want it incorporated.
Step 2: Folding in the Whipped Cream
Now, for the magic that makes this cheesecake filling so wonderfully light and decadent. We’ve already whipped our heavy whipping cream to stiff peaks, which means it holds its shape beautifully and won’t collapse. Gently fold this whipped cream into the cream cheese mixture. The key here is “folding.” Use a spatula and a light hand, scooping from the bottom of the bowl up and over the cream cheese mixture, rotating the bowl as you go. This technique preserves the air in the whipped cream, ensuring our filling remains light and fluffy, not dense. Continue folding until just combined, being careful not to deflate the whipped cream. You should have a lovely, airy, and smooth cheesecake filling.
Banana Pudding Layer
This is where the classic banana pudding flavor really shines through!
Step 3: Preparing the Instant Banana Pudding
Next, we’ll prepare the instant banana pudding. In a separate, larger bowl, whisk together the instant banana pudding mix with the 2 cups of cold milk. It’s important to use cold milk for instant pudding, as it helps it set up properly and achieve the desired creamy texture. Whisk vigorously for about 2 minutes, or until the pudding starts to thicken. You’ll notice it becoming much thicker and smoother as you whisk. Let this pudding sit for about 5 minutes to allow it to fully set up. Don’t skip this resting period, as it’s essential for the pudding’s consistency.
Step 4: Marrying the Flavors
Once the banana pudding has set, it’s time to bring our two delicious components together. We’ll gently fold the thickened banana pudding into our prepared cheesecake filling. Again, use that same gentle folding technique with your spatula. You want to create beautiful swirls of cheesecake and banana pudding, rather than a uniform mix. This will give us delightful pockets of flavor and texture in every bite. Don’t overmix; a marbled effect is exactly what we’re aiming for. This creates a visually appealing and texturally interesting filling.
Assembling the Cones
The fun part where everything comes together!
Step 5: Filling the Cones
Now for the grand finnon-alcoholic ale: assembling our Banana Pudding Cheesecake Cones! Take your waffle cones and carefully spoon the banana pudding cheesecake mixture into each one. Fill them generously, but try not to overfill them to the point of overflowing. A spoon works well, but you can also use a piping bag with a large round tip for a neater finish and a more professional look if you prefer. Once filled, sprinkle the top of each cone with the ½ cup of crushed vanilla wafers or grabeef beef ham crackers. This adds a delightful crunch that mimics the classic banana pudding crum extractble.
Step 6: The Finishing Touches
To elevate these cones from delicious to absolutely irresistible, we’ll add our final touches. Drizzle generously with caramel sauce or sweetened condensed milk. Both offer a wonderful sweetness that pairs perfectly with the banana and cheesecake flavors. For an extra touch of texture and visual appeal, sprinkle a little more crushed vanilla wafers on top of the drizzle.
Serving and Enjoying
These Banana Pudding Cheesecake Cones are best enjoyed immediately after assembly to ensure the waffle cone remains crispy and the filling is perfectly chilled. You can prepare the filling a few hours in advance and refrigerate it, then assemble the cones just before serving. If you have any leftover filling, you can serve it in small bowls as a deconstructed banana pudding cheesecake treat! Enjoy this delightful fusion of your favorite desserts!
Conclusion:
And there you have it – the ultimate guide to creating delicious Banana Pudding Cheesecake Cones! This recipe is truly a showstopper, blending the creamy decadence of cheesecake with the nostalgic comfort of banana pudding, all nestled within a crispy waffle cone. It’s the perfect dessert for birthdays, potlucks, or simply when you crave a treat that’s both fun and incredibly satisfying. The interplay of textures – smooth cheesecake, soft banana, and crunchy cone – is simply divine.
For serving, I love presenting these as individual delights. They look stunning on a dessert platter and are incredibly easy for guests to grab and enjoy. Feel free to get creative with your toppings! A sprinkle of crushed vanilla wafers, a drizzle of caramel sauce, or a few fresh banana slices can elevate your Banana Pudding Cheesecake Cones even further. For variations, consider adding a hint of cinnamon to the cheesecake filling or using grabeef ham cracker crust crum extractbs instead of vanilla wafers for a different flavor profile. Don’t be afraid to experiment and make these your own! I truly encourage you to give this recipe a try. It’s a surprisingly achievable dessert that delivers big on flavor and “wow” factor.
Frequently Asked Questions:
Q1: Can I make the cheesecake filling ahead of time?
Absolutely! You can prepare the cheesecake filling up to 24 hours in advance and store it covered in the refrigerator. This can save you some time on assembly day. Just be sure to give it a good stir before spooning it into the cones.
Q2: What are some good alternatives to waffle cones?
If waffle cones aren’t readily available, you have a few excellent options! Sugar cones or even cake cones would work. For a more decadent experience, you could even use chocolate-dipped cones or cookie cones. The key is to have a sturdy vessel that can hold the delicious filling.
Banana Pudding Cheesecake Cones
A delightful no-bake dessert combining creamy cheesecake, banana pudding, and the crunch of waffle cones and vanilla wafers.
Ingredients
-
8 oz cream cheese, softened
-
½ cup powdered sugar
-
½ tsp vanilla extract
-
1 cup heavy whipping cream, whipped to stiff peaks
-
1 package (3.4 oz) instant banana pudding mix
-
2 cups cold milk
-
8 waffle cones
-
½ cup crushed vanilla wafers
-
Caramel sauce drizzle
-
Extra crushed vanilla wafers
Instructions
-
Step 1
In a large bowl, beat softened cream cheese until smooth. Gradually beat in powdered sugar and vanilla extract until well combined. -
Step 2
Gently fold in the whipped heavy cream until just incorporated, creating a smooth cheesecake mixture. -
Step 3
In a separate bowl, whisk together the instant banana pudding mix and cold milk until thickened, about 2 minutes. Let it set for 5 minutes. -
Step 4
Gently fold the prepared banana pudding into the cheesecake mixture until evenly distributed. -
Step 5
Spoon the banana pudding cheesecake filling into the waffle cones, filling them about three-quarters full. -
Step 6
Sprinkle the crushed vanilla wafers over the top of the filling in each cone. -
Step 7
Drizzle generously with caramel sauce. -
Step 8
Garnish with extra crushed vanilla wafers before serving immediately or chilling for later.
Important Information
Nutrition Facts (Per Serving)
It is important to consider this information as approximate and not to use it as definitive health advice.
Allergy Information
Please check ingredients for potential allergens and consult a health professional if in doubt.