Small-Batch Black Forest Brownies – Decadent Treat
Small-Batch Black Forest Brownies are not just a dessert; they are a decadent escape, a miniature celebration of rich chocolate and tart cherries that will transport you straight to the heart of the Black Forest region. If you’ve ever found yourself craving that iconic combination of deep, dark chocolate, fluffy whipped cream, and bursts of cherry goodness, but balked at the thought of a whole cake, then these brownies are your dream come true. We all adore the classic Black Forest cake for its sophisticated layers and delightful flavor profile, but sometimes, what we truly need is a more portable, shareable (or perhaps not!) indulgence. That’s where these extraordinary Small-Batch Black Forest Brownies step in, offering all the beloved flavors in a perfectly portioned, intensely satisfying form. What makes them so incredibly special? It’s the meticulous balance of intense cocoa, the surprising zing of kirsch extract-infused cherries, and a texture that’s both fudgy and delightfully chewy, all crafted in a size that feels just right. Get ready to experience pure bliss in every single bite.
Ingredients:
- ¼ cup unsalted butter
- ½ cup granulated sugar
- 1 large egg
- ½ tsp vanilla extract
- ¼ cup unsalted cocoa powder
- ¼ cup all-purpose flour
- ⅛ tsp salt
- ½ cup canned or jarred cherries, pitted and drained (reserve the juice)
- 2 tbsp reserved cherry juice
- ½ cup whipped cream, for topping
- Chocolate shavings, for optional garnish
Preparation and Mixing the Batter
Step 1: Melt the Butter and Prepare Your Pan
Begin extract by preheating your oven to 350°F (175°C). While the oven heats, lightly grease an 8×8 inch baking pan or line it with parchment paper, ensuring there’s an overhang on two sides for easy lifting later. This step is crucial for preventing your delicious brownies from sticking and making cleanup a breeze. In a medium microwave-safe bowl, melt the ¼ cup of unsalted butter. You can do this in 30-second intervals, stirring between each, until the butter is completely liquid and smooth. Avoid overheating it; just melted is perfect.
Step 2: Combine Wet Ingredients and Sugar
Once the butter is melted, remove it from the microwave. Add the ½ cup of granulated sugar to the warm butter and whisk vigorously until well combined. The mixture should look glossy. Now, crack in your 1 large egg and add the ½ teaspoon of vanilla extract. Continue whisking until everything is thoroughly incorporated and the batter is smooth and emulsified. This combination of fat, sugar, and egg forms the foundation of your brownie’s rich texture and flavor. Ensuring the egg is fully beaten in will prevent any streaks of uncooked egg in your finished brownies.
Step 3: Incorporate Dry Ingredients
In a separate small bowl, whisk together the ¼ cup of unsalted cocoa powder, ¼ cup of all-purpose flour, and ⅛ teaspoon of salt. Sifting these dry ingredients is a great tip for ensuring no lumps and a more even distribution throughout the batter, leading to a more consistent brownie texture. Gradually add these dry ingredients to the wet ingredients in the larger bowl. Using a spatula, gently fold them in until just combined. Be careful not to overmix at this stage; overmixing can develop the gluten in the flour, resulting in tougher brownies. Stop mixing as soon as you no longer see any streaks of dry flour.
Incorporating the Black Forest Elements
Step 4: Add the Cherries and Cherry Juice
Now for the signature Black Forest touch! Gently fold in the ½ cup of drained canned or jarred cherries into your brownie batter. You want to distribute them evenly without crushing them too much. Next, drizzle in the 2 tablespoons of reserved cherry juice. This juice will infuse the brownies with a subtle fruity flavor and a beautiful reddish hue, truly embodying the Black Forest spirit. Again, fold this in gently until it’s just incorporated. The batter will be thick but should still be pourable.
Baking and Finishing
Step 5: Bake and Cool Your Brownies
Pour the brownie batter evenly into your prepared baking pan. Spread it out with your spatula to ensure an even layer. Place the pan in the preheated oven and bake for 20 to 25 minutes. The exact baking time will depend on your oven and how fudgy you prefer your brownies. To check for doneness, insert a toothpick into the center. It should come out with moist crum extractbs attached, but not wet batter. If it comes out clean, they might be overbaked. Once baked, carefully remove the pan from the oven and let them cool completely in the pan on a wire rack. This cooling process is essential for the brownies to set properly and achieve the perfect texture. Rushing this step can lrum extract to crumbly brownies.
Step 6: Serve and Enjoy
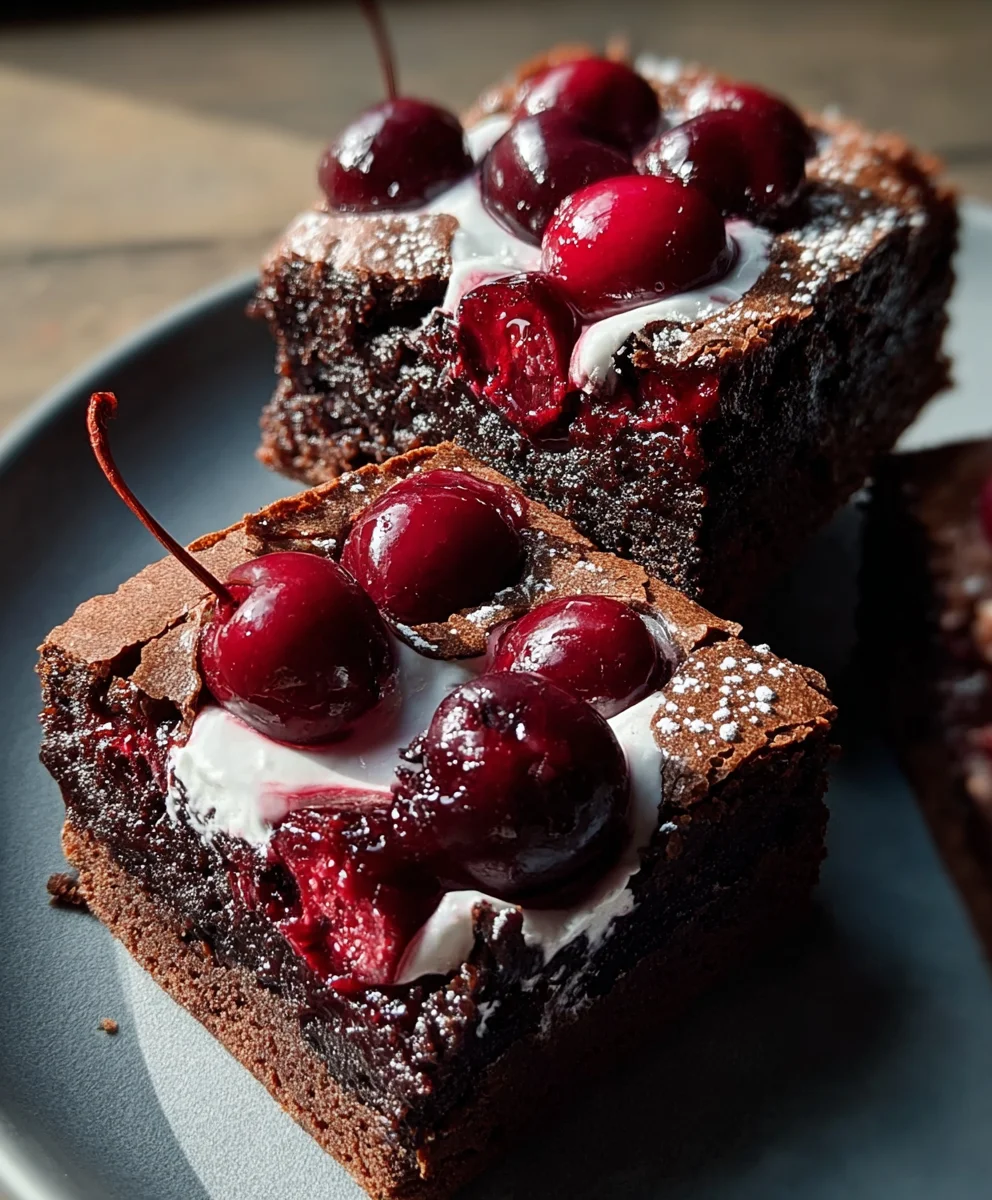
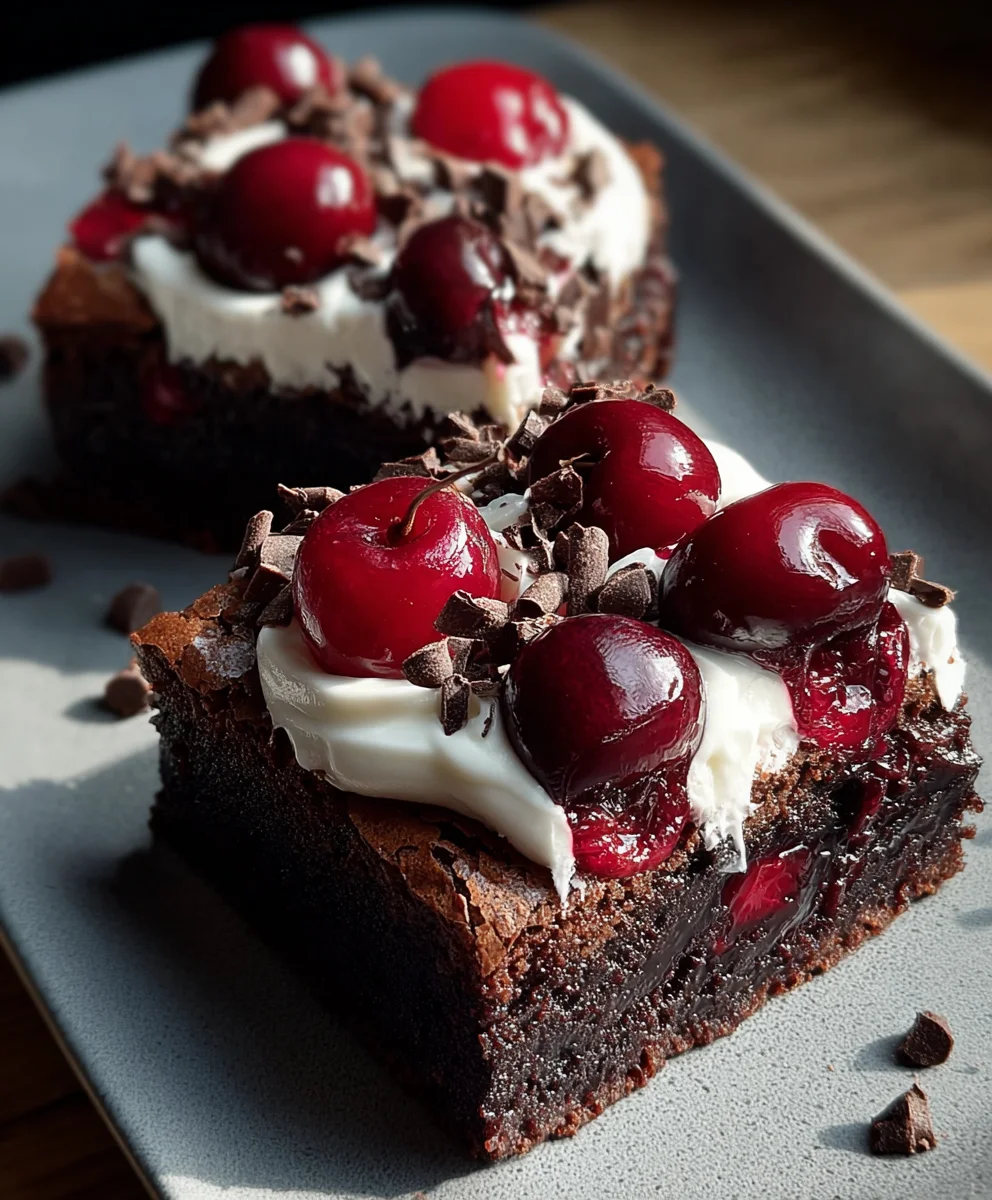
Once your brownies are completely cool, use the parchment paper overhang to lift them out of the pan. Cut them into your desired serving sizes. For an authentic Small-Batch Black Forest Brownie experience, top each brownie with a dollop of ½ cup of whipped cream and a sprinkle of chocolate shavings if you’re feeling fancy. The contrast of the rich, fudgy brownie with the light, airy whipped cream and the burst of cherry flavor is simply divine. These brownies are best enjoyed fresh, but can be stored in an airtight container at room temperature for up to 2 days.
Conclusion:
And there you have it – your guide to creating delicious Small-Batch Black Forest Brownies! We’ve walked through the simple steps to achieve fudgy, chocolatey perfection with those delightful cherry and whipped cream accents. These brownies are wonderfully versatile, perfect for a special treat when you don’t want a whole pan. They’re fantastic served warm with a dusting of powdered sugar, or chilled for a more dense and rich experience. Don’t be afraid to get creative! You can experiment with different types of cherries, add a touch of kirsch extract liqueur extract to the batter for an authentic flavor boost, or even swirl in some chocolate ganache before baking.
I truly hope you enjoy making and devouring these Small-Batch Black Forest Brownies as much as I do. They’re a little slice of heaven that’s surprisingly easy to whip up.
Frequently Asked Questions:
Can I make these Small-Batch Black Forest Brownies ahead of time?
Yes, absolutely! These brownies store beautifully in an airtight container at room temperature for up to 3 days, or in the refrigerator for up to a week. Chilling them can actually enhance their fudgy texture.
What kind of cherries are best for Small-Batch Black Forest Brownies?
For the most authentic flavor, I recommend using good quality pitted dark sweet cherries, either fresh or frozen. If using jarred cherries, make sure they are well-drained to avoid adding too much excess moisture to the batter.
Small-Batch Black Forest Brownies – Decadent Treat
Decadent, fudgy brownies infused with the classic flavors of Black Forest cake, featuring cherries and a creamy whipped topping.
Ingredients
-
1/4 cup unsalted butter
-
1/2 cup granulated sugar
-
1 large egg
-
1/2 tsp vanilla extract
-
1/4 cup unsalted cocoa powder
-
1/4 cup all-purpose flour
-
1/8 tsp salt
-
1/2 cup canned or jarred cherries, pitted and drained (reserve the juice)
-
2 tbsp reserved cherry juice
-
1/2 cup whipped cream, for topping
-
Chocolate shavings, for optional garnish
Instructions
-
Step 1
Preheat oven to 350°F (175°C). Grease an 8×8 inch baking pan or line it with parchment paper. Melt the butter in a microwave-safe bowl. -
Step 2
Whisk the melted butter with granulated sugar until glossy. Add the egg and vanilla extract, whisking until smooth and emulsified. -
Step 3
In a separate bowl, whisk together cocoa powder, flour, and salt. Gradually fold the dry ingredients into the wet ingredients until just combined; do not overmix. -
Step 4
Gently fold in the drained cherries and the reserved cherry juice until just incorporated. -
Step 5
Pour batter into the prepared pan and spread evenly. Bake for 20-25 minutes, or until a toothpick inserted into the center comes out with moist crumbs. Let cool completely in the pan. -
Step 6
Once cooled, lift brownies out using parchment overhang. Cut into desired sizes. Top with whipped cream and optional chocolate shavings before serving.
Important Information
Nutrition Facts (Per Serving)
It is important to consider this information as approximate and not to use it as definitive health advice.
Allergy Information
Please check ingredients for potential allergens and consult a health professional if in doubt.